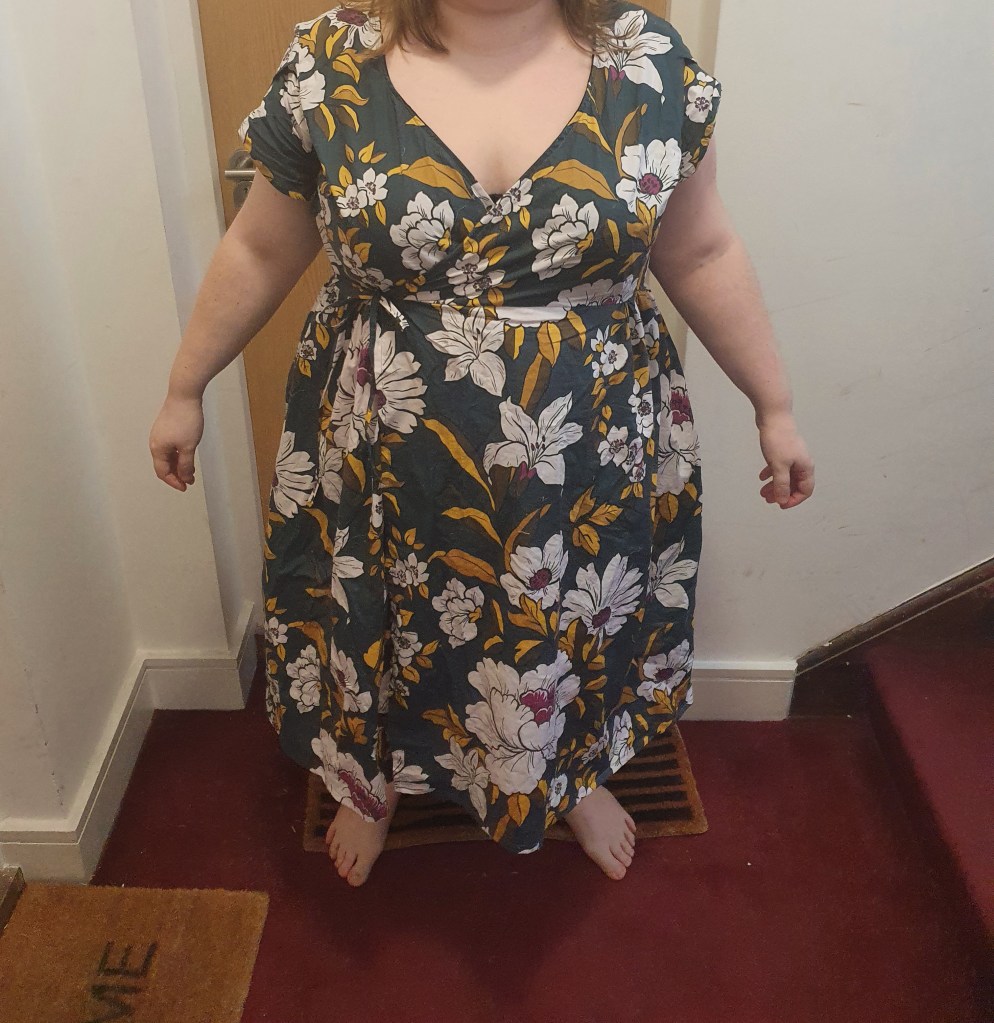
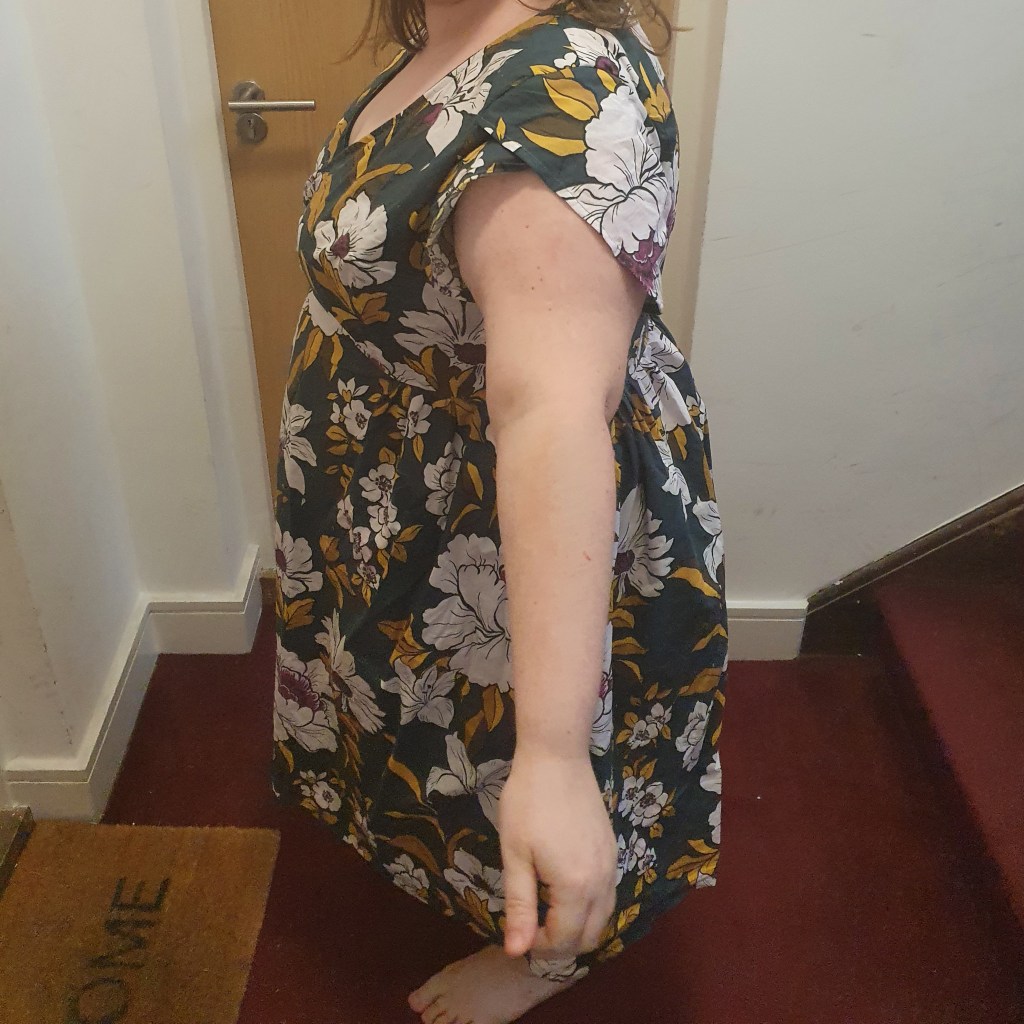
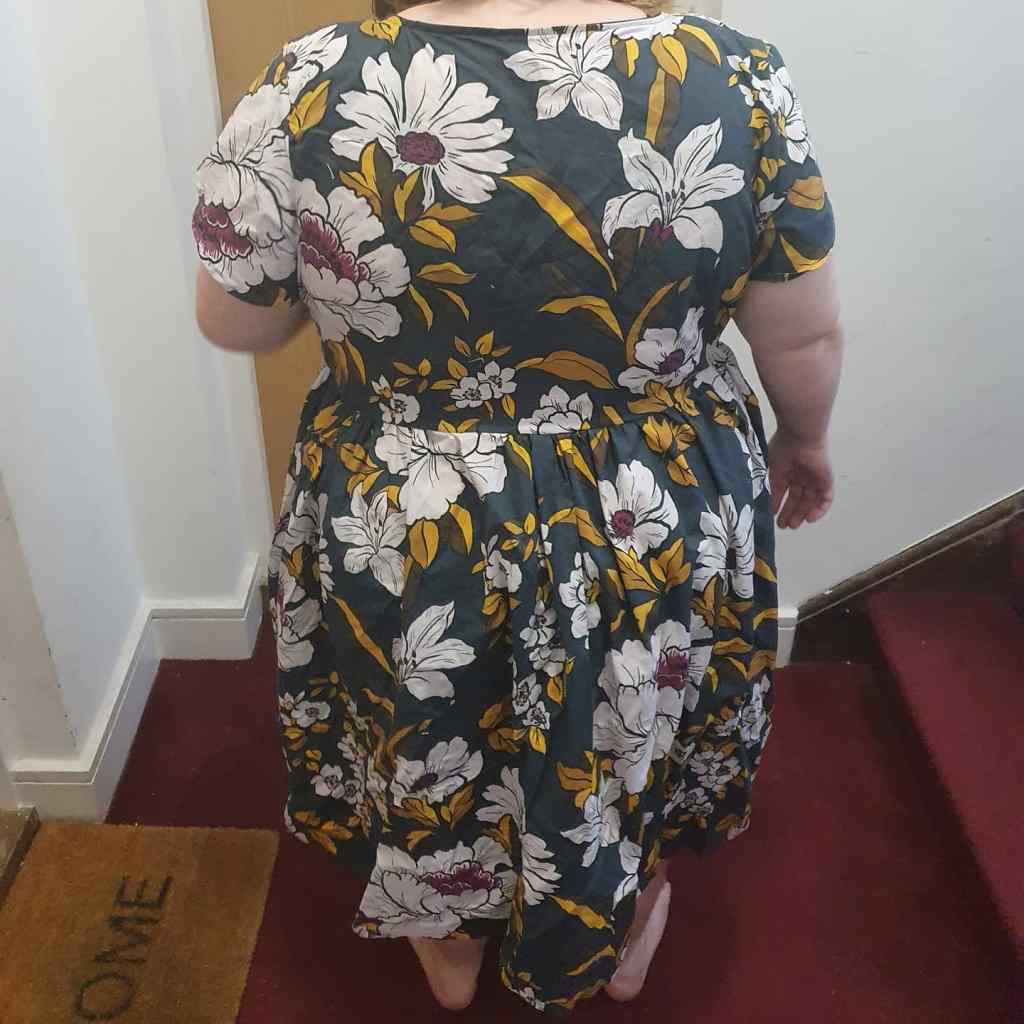
Like so many people, I fell in love with the Oscar de la Renta floral mini dress that Taylor Swift wore to the 2021 Grammys. I loved the organic beauty and romance of the embroidered flowers climbing the dress, and the blend of 3D elements with 2D embroidery. I also loved the shape – it felt like a contemporary romantic take on a mod silhouette, and there’s nothing I love more than mod silhouettes.
So when The New Craft House held a Spring Fling party in 2023, I decided to take the opportunity to make a version of this dress for myself. I didn’t want to make a literal copy – I had a traditional 60s A-line shift in mind. Something that would also be a little less restrictive to wear, and accessible as it wouldn’t need fastenings. I also knew that I would personally want more dense embroidery for coverage, as I didn’t want to sew a slip to go underneath.
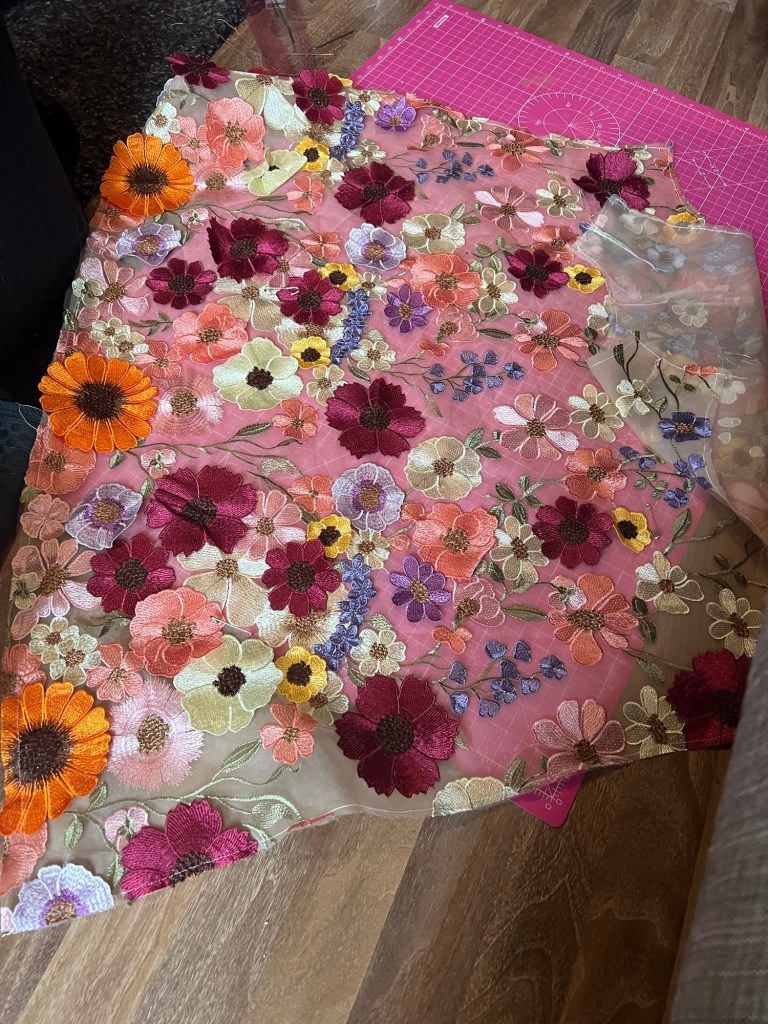
My embroidered fabric was sourced from Etsy but I gather that you can get similar fabrics on other sites. I ordered 5 yards because I knew the embroidery would be sparse in parts and I would want more fabric to make the dress have higher opacity. Pattern-wise, I went straight for the Adrift Shift by Gracie Steele. I made a few toiles of this and knew it fitted me well and had the shape I wanted. However, when I cut my pattern pieces out in the embroidered tulle, I realised that I was going to need to do something to give the dress structure – the tulle wouldn’t hold the A line shape at all. So I went on a journey and learned about underlining. I did research and settled on silk organza; not cheap, but I don’t handle synthetic fibres well and this was meant to be a knockout dress that I could wear on future special occasions. Underlining worked like a dream – the pattern pieces held their shape wonderfully.
The original tulle piece, underlined but without additional flowers added
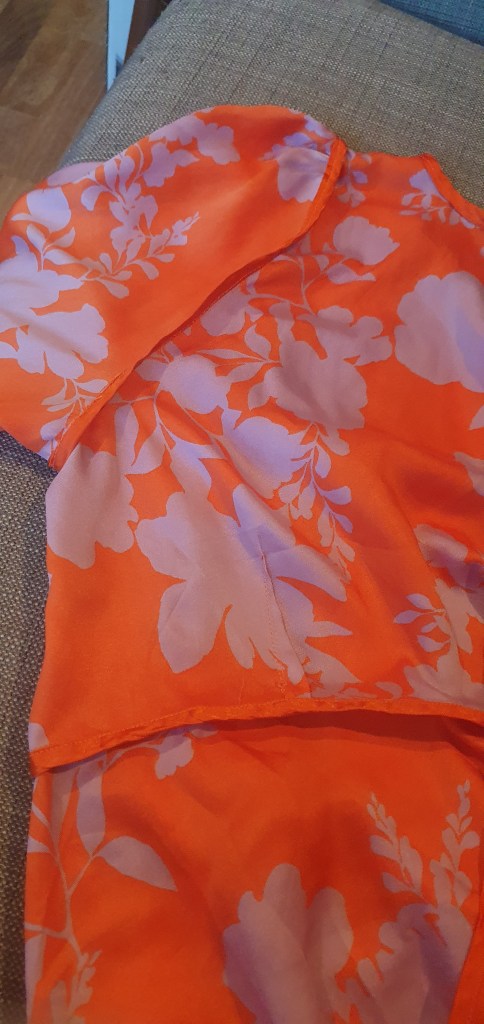
Once I’d attached the tulle pieces to the organza pieces, I then set about embellishing the tulle layer with additional flowers, as the embroidery on the tulle was more sparse than I would like. By sewing these onto both the tulle and organza layers, this had the added benefit of strengthening the underlining so that the layers didn’t separate or bag – they were thoroughly attached.
Adding the additional flowers I’d cut out
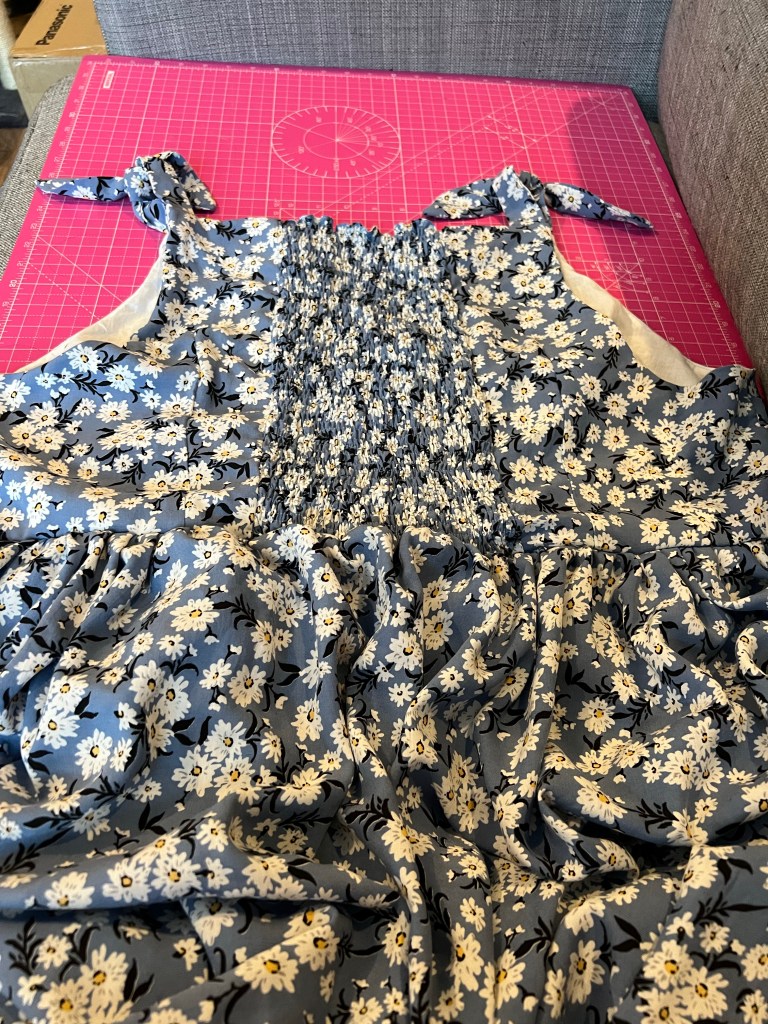
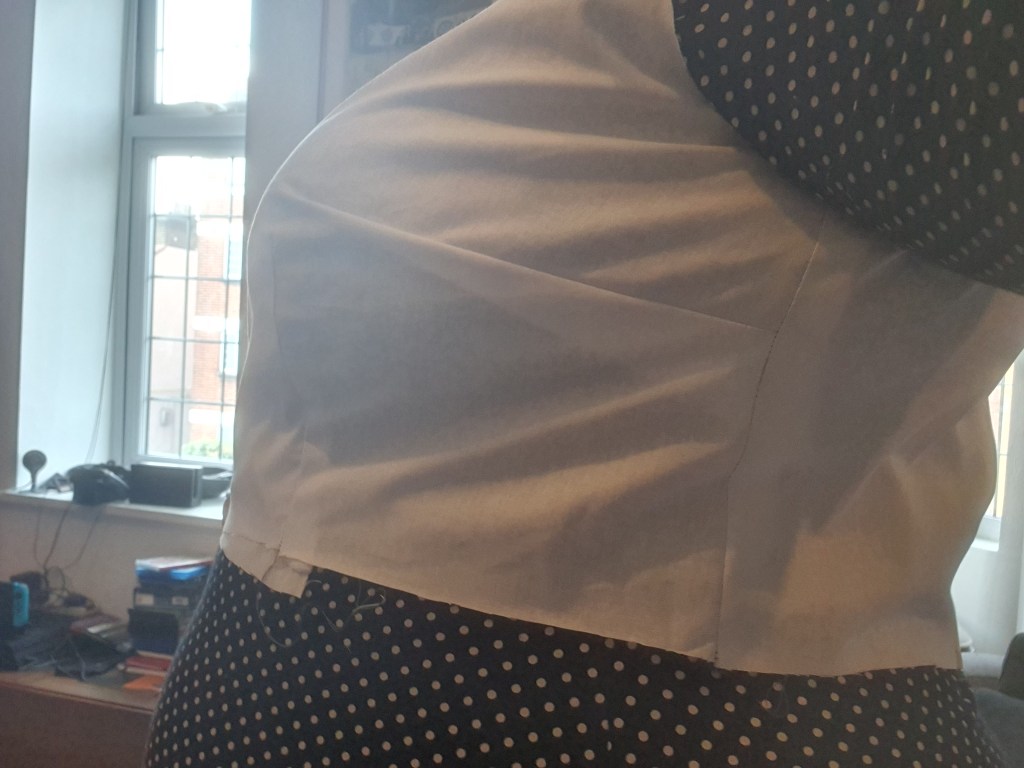
All in all, I cut the embroidered flowers out of the remaining 3 yards of tulle, and hand sewed them onto the dress using invisible thread. This was LABORIOUS! I spent about 8 hours cutting out flowers and 20 hours hand-sewing them on. I chose to add the additional flowers so that the effect was dense at the bottom of the dress, getting slightly sparser moving up (although still giving good coverage over underwear) and then had more mesh on show at the shoulder.
During the embellishment process – you can see the variation in density of embroidery. The bottom hem is at the right of the photo.
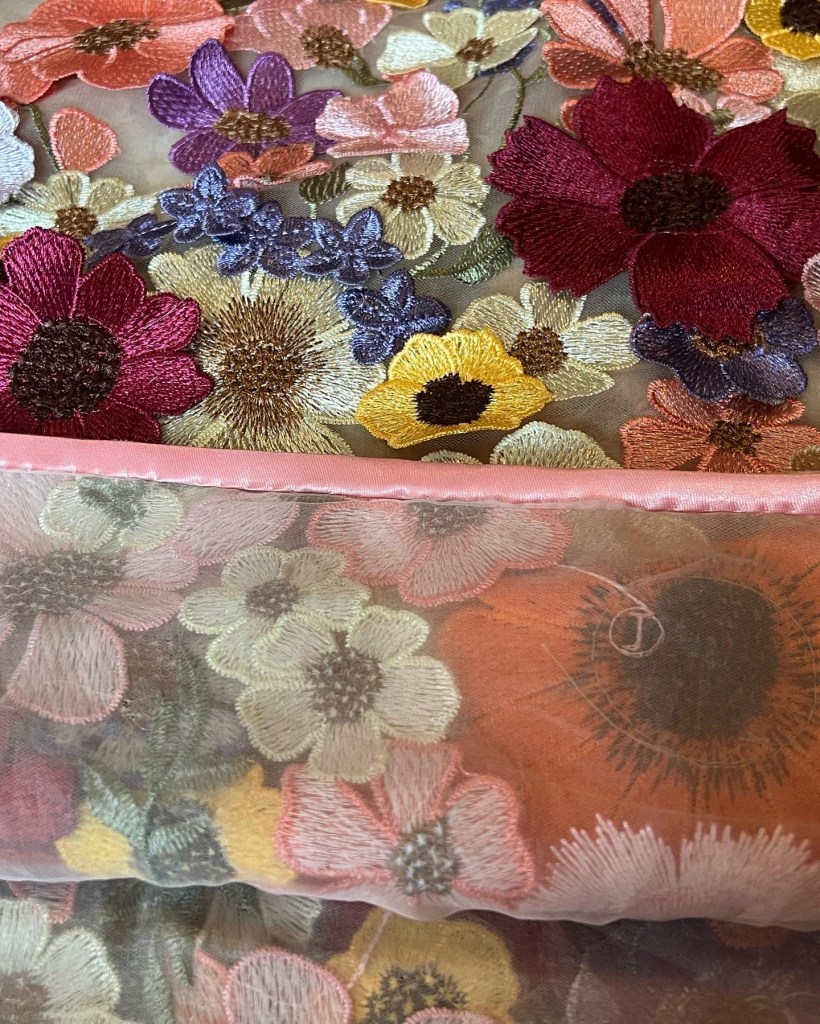
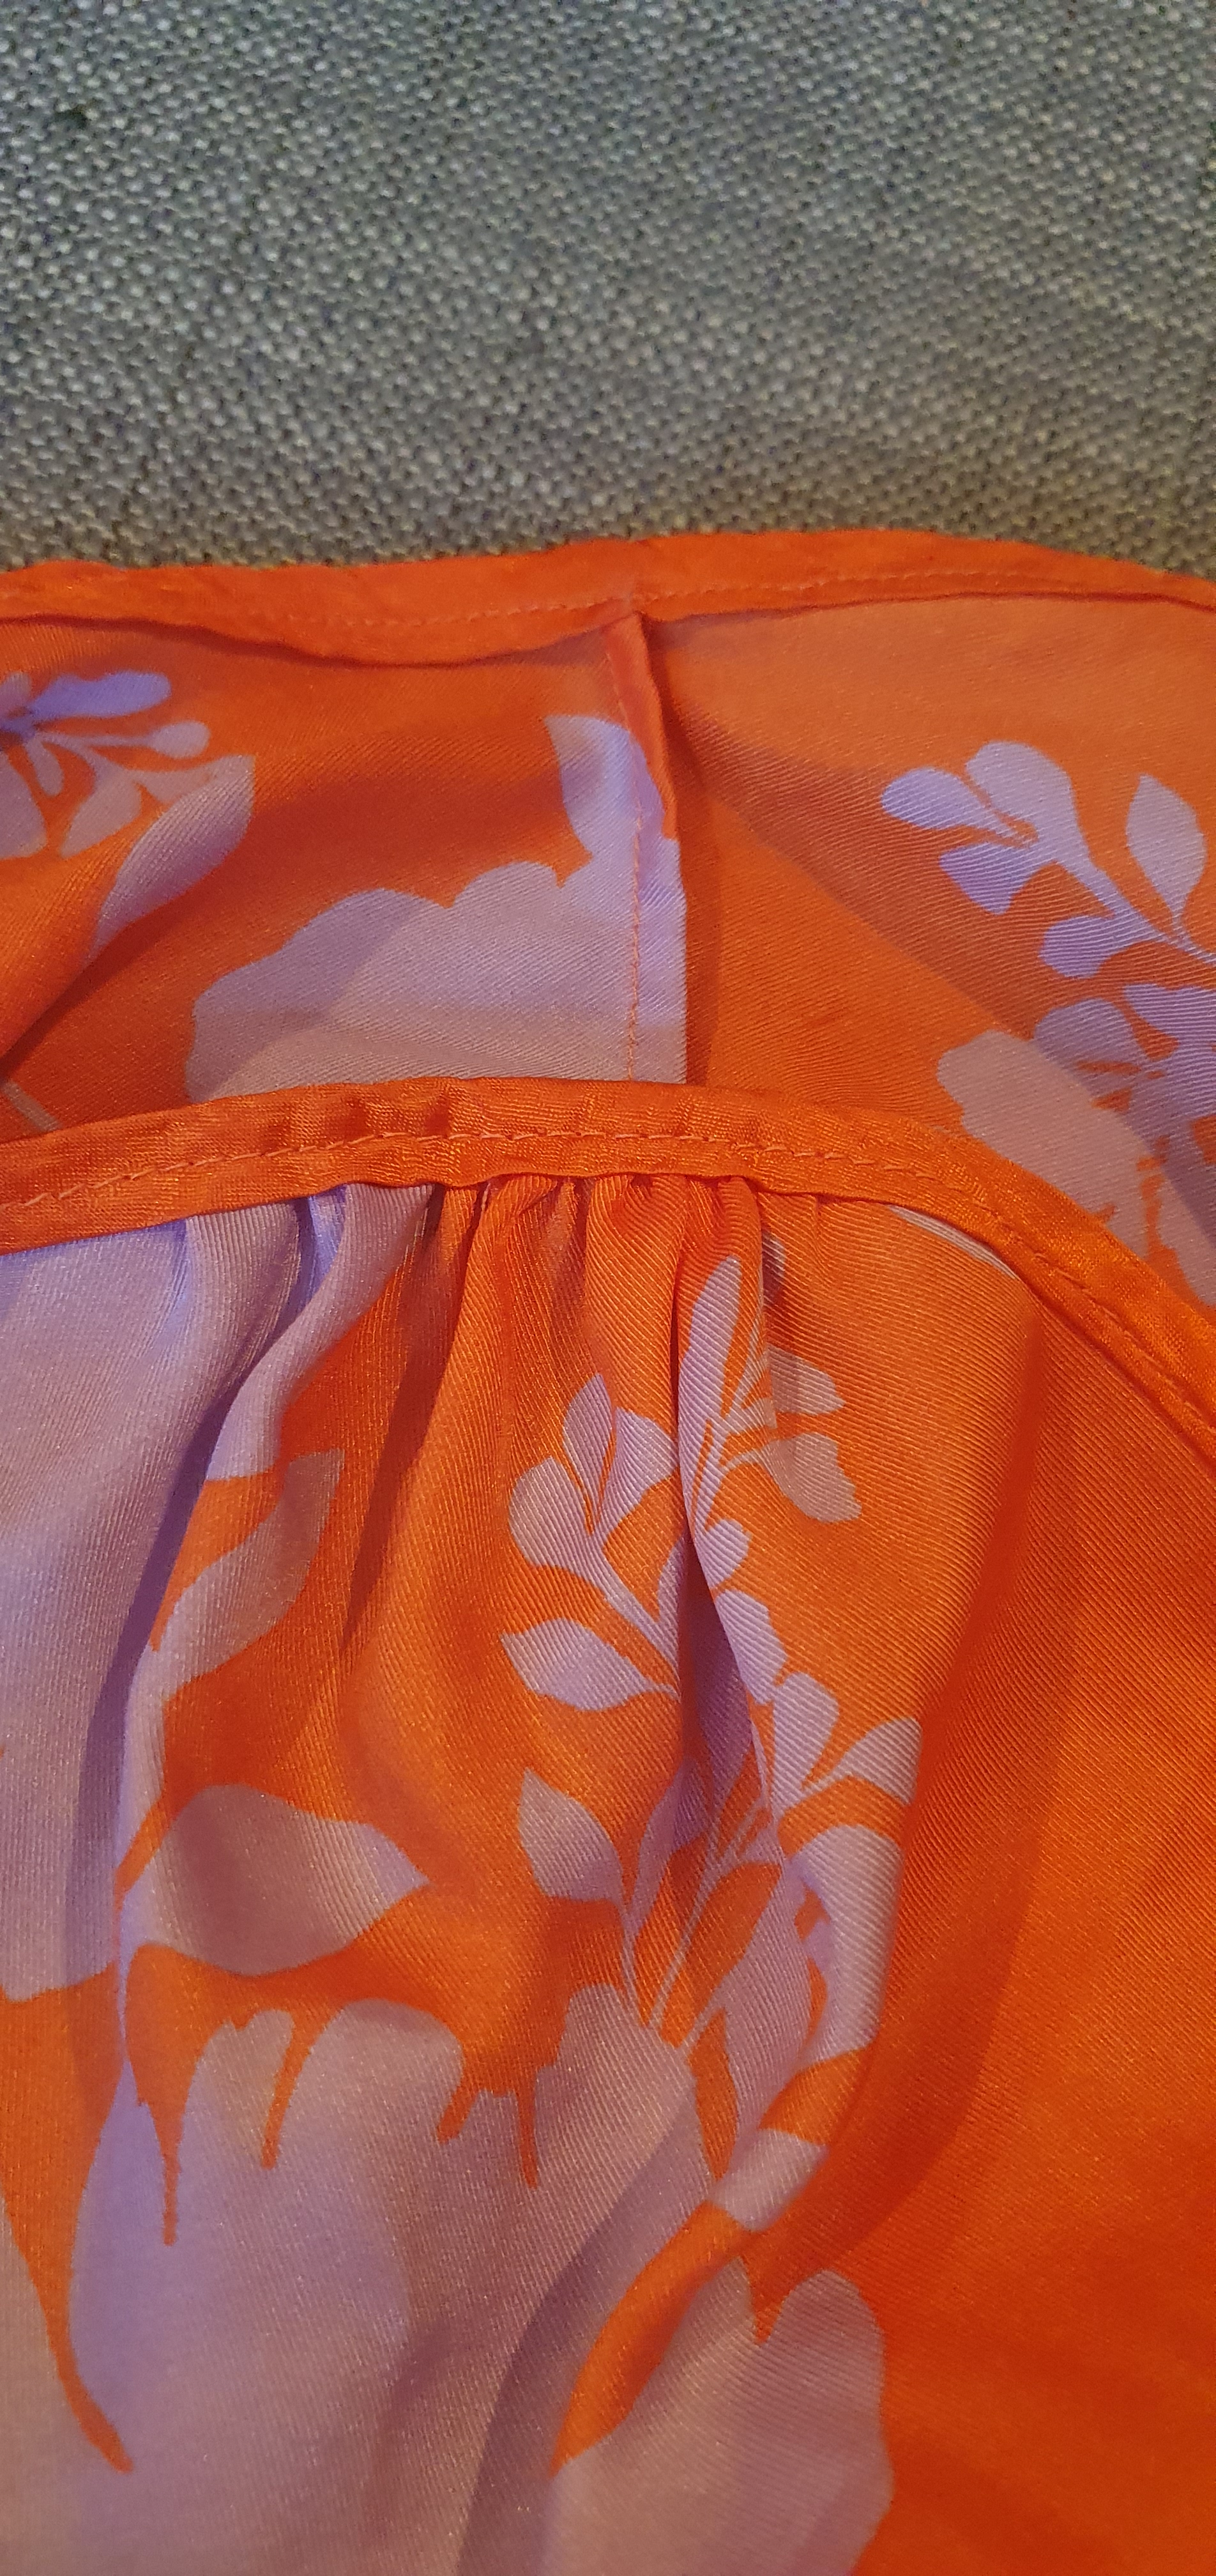
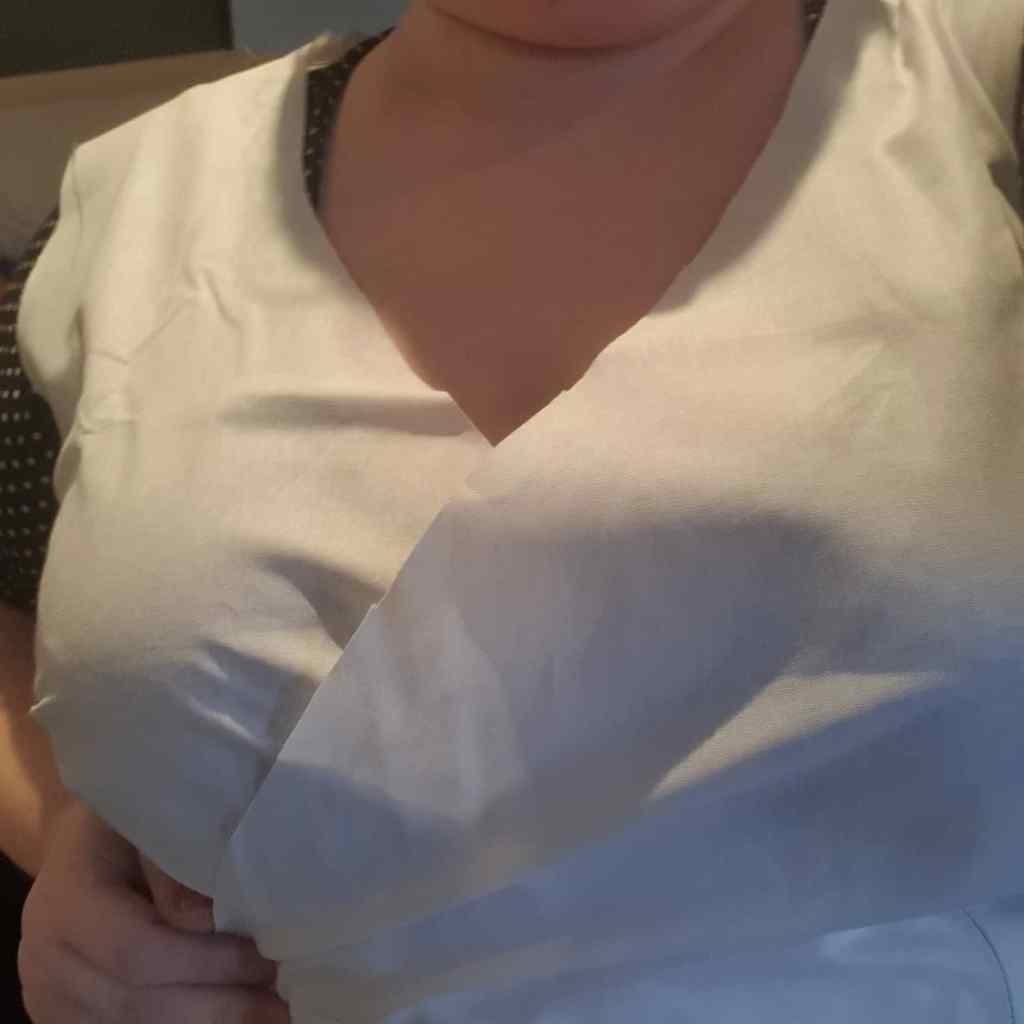
The final technical finish was to bias face the armscyes, neckline and hem with pink satin bias binding that wouldn’t be obtrusively visible, but would encase the raw edges and provide a clean finish. I wanted to keep the organic, romantic elements of the original dress, so chose to add flowers over the neckline, armscyes and hem – I didn’t want to cut the flowers and have clean lines as I felt that would look more artificial.
The neckline – bias faced with additional flowers to hide the facingOne of the armholes. Embroidered flowers hide the edge of the armhole. The underneath of the underlined tulle, bias faced at the hem.
This was one of my first forays into technical manipulation of fabric. Underlining is a process which changes the structure of the fashion fabric by using another fabric to alter its drape and weight. It’s a very useful technique, and one I’ve used again on another Adrift Shift to keep the A line style lines whilst using a drapey fabric. It is a little tedious as you need to anchor the two fabrics together with rows of hand-sewn stitches across the pattern pieces, as well as machine sewing them together at the edges. But in this case, this dress would not have had the same impact if I hadn’t underlined it.
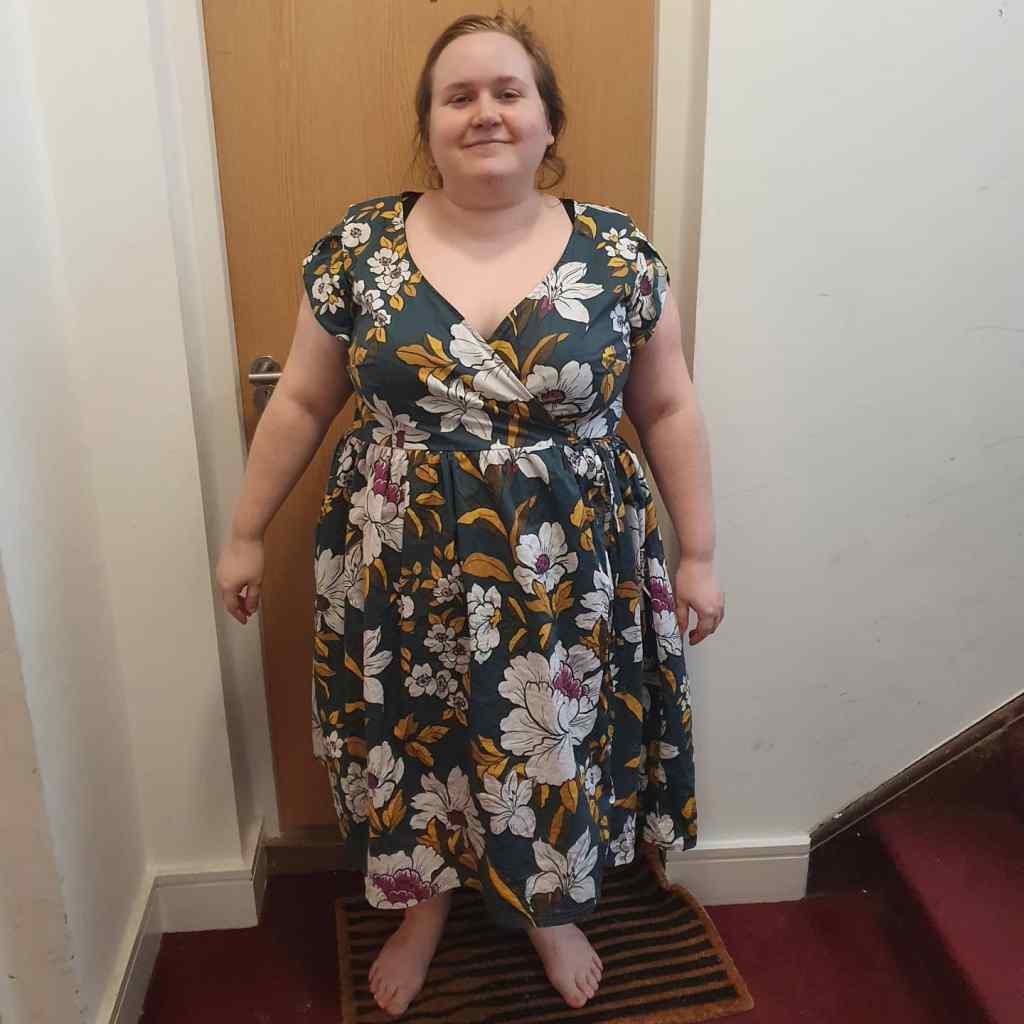
And how did the finished dress come out?
It came out great! It was everything I’d hoped it would be, and I felt amazing wearing it. I’ve since reworn it for a special occasion, and it felt just as special the second time around.
It was incredibly empowering to realise that I could make something that was so involved – it’s one of my biggest ever projects in terms of time invested, but every hour hand-sewing was worth it. It’s awoken a desire within me to make more involved and technically complex garments, and given me confidence that I can make the kind of clothes that I would love to be able to afford.
At the beginning of 2022 I decided that I would try to not buy fabric for a full year. The last purchase I made was on 1 Jan 2022 (a sale purchase – I made the decision to not buy a few days into 2022, so my year wouldn’t quite run for the full calendar).
Why?
Since starting sewing I’ve amassed a large stash. Some of it is fabric I bought before I understood what fabrics I liked; a lot of this has either been sold on or designated toile fabric. Some of it is fabric bought for a very specific purpose at a point in time, but which hasn’t been made up yet (eg coating fabrics). Some of it was limited edition fabric, which I knew I couldn’t get down the line. A lot of it, however, was from FOMO purchasing.
If you’re asking what FOMO purchasing is, it’s a term I use for how the way the sewing community has evolved has led to increased financial consumption for Fear Of Missing Out. That can be fabric, patterns, haberdashery – anything. And it can be driven by different things. Examples are: limited edition runs, so you have to purchase within a certain window or it’s never available again; deadstock, where there is only ever a limited quantity of left over stock from a designer or manufacturer, so once it’s gone it’s gone; increasing use of ‘drops’ with products made available at a set time on a set schedule (eg weekly, biweekly, or irregularly but with marketing in the lead up) to drive up buzz and encourage quick sales; or more traditional tools like discounts or sale prices over a date range.
I used to subscribe to a lot of fabric shops and follow them all on instagram. I got into the habit of checking their drops as soon as they launched, and spurred on by unknown stock levels, promises of limited quantity and once it’s gone it’s gone, I would panic buy. Sometimes that meant buying more yardage to be on the safe side and because I didn’t know how I’d use it, but I knew I wanted it; and sometimes it meant purchasing items that, when they arrived, I later regretted. Of course, the facts of buying fabric by the yardage mean it isn’t returnable as it’s cut to order.
What rules did you set yourself?
The main rule was that I couldn’t buy main fabric for a garment for myself. I could buy things like interfacing, provided I needed it (i.e. I had run out or it was a specific kind for a project); I could buy a fabric if it had a technical purpose (eg toiling something that needed a specific kind of fabric and my stash of cotton poplin/lawn/poly/viscose wouldn’t do); and I could buy fabric for making things for others. Towards the end of the year I also allowed myself to buy a small amount of fabric for quilting, as I made my first quilt this year and really enjoyed it. So I now have a small stash of quilting fabric in my favoured colours, so that I can work as and when I want to.
This means I technically did buy fabric this year (in the strictest sense) but the key was to address the habits I had formed about buying fabric for myself, so for the purposes of this challenge I didn’t count those as purchases.
What made you break your challenge?
The reason I didn’t complete a full year was solely that Rainbow Fabrics secured wool suiting yardage at great prices. I have to wear suits for work and I have been wanting to get into making my own tailored suits for a while, as the plus size RTW market is extremely limited (and even moreso post-Covid as RTW plus size formal office wear has drastically reduced). I’d bought some in 2021 and had learned what prices to expect, and the availability of yardage. To put it bluntly: I need more yardage than is often available in deadstock or remnants for a full suit due to my measurements, and buying wool suiting yardage at RRP is *very* expensive. It’s very good to even get deadstock 100% wool suiting at £20pm, and Rainbow Fabrics had it for £10pm and discount codes. Frankly, it was far too good a deal to pass up. It was a no brainer, and I genuinely would have been annoyed at myself if I had waited and missed out, because it’s that rare an opportunity.
Since breaking my ban, I have bought some other fabric. I had a little burst where I got ‘up to date’ with all the fabric shops, as they had entirely new stock given it had been 10 months, but I haven’t gone back into old habits. I do get an urge when I see that something is going to be discontinued or is reduced in a sale, but I make myself reflect in a way that I didn’t used to, and I buy a fraction of what I would have before. I think very carefully about the fibre, colours, weights and intended uses of fabric now, and most of the time one of those factors means that I decide not to buy something.
Lessons learned
1) I have a very big stash. There is usually a suitable fabric in my stash, and I can use that fabric instead of buying. I enjoy shopping my stash!
It’s a seemingly simple lesson, but it’s true. If I browse a fabric shop and I see a nice jersey that could work for a t-shirt – I probably have something similar or something in my stash that I would be equally happy to use. A patterned woven? I’ve got plenty. Coatings? I have a few. The past year has been really good for reminding myself of what I have already bought, because the simple fact is that it’s hard to keep track when it’s in drawers and cupboards and not easily visible.
Towards the end of 2021 I started using an Airtable template by @jenbensews on instagram for tracking my stash and my projects. It’s worked very well for me because it’s got the level of detail that I like, and I can break down data from it. It doesn’t have my entire stash in it, but I’ve been putting in everything I’ve bought and everything I use as I use it, so it’s building up. Other options I recommend include an app called Stash Hub, which is by @blossomsandwich on instagram. Options like these mean you can search through your stash digitally to see what you have, how much of it you have, whether you’ve pre-washed it etc.
2) I now have an idea of how quickly I consume fabric.
For 2022 I also logged data on exactly how many metres I’d used on completed garments, WIPs, and on planned projects. This year my completed garments comes to 61.75m of fabric. Knowing that is very helpful, as it helps me limit what I buy so that my consumption is adjusted to my usage. I wanted to be more mindful about consumption in general, and sewing is one of those activities where you can feel like you’re being sustainable by making your own clothes, but actually you’re still driven by consumerism and fast fashion – just in a different way.
My goal in tracking what I make was in being more mindful overall. It has certainly made me think twice about consumption, but it’s also been very helpful in reflecting on things. For example, I log pattern notes in my Airtable, and I can track how many times I’ve made a garment using that pattern. I can see where my making is concentrated, and where there are gaps. I can also remind myself of items in my handmade wardrobe that I can’t immediately see in my physical wardrobe. Tracking my sewing practice has been incredibly motivational – I’ve loved seeing my stash go down, both in data and physically. 60m is a lot of space that’s freed up!
3) That I didn’t miss buying fabric, and I only felt regret at missing out on two fabrics during that 10 months.
I immediately unfollowed all the shops and unsubscribed from most newsletters, if not all. I let myself keep signed up to one or two for other things, like events, but I generally ignored the ‘new in’ sections. Very occasionally I did make myself look at new in knowing I wouldn’t let myself cave, just so that I began to experience looking but not buying.
I can honestly say that there were only two fabrics I was sad I missed out on; one was deadstock Dior toile de juoy and one was a Pigeon Wishes deadstock fabric. They were both very unique and they were instantly a ‘hell yes’ fabric. And that has made me think more about how I feel about fabric, and that I shouldn’t be buying anything that isn’t a ‘hell yes’. I shouldn’t buy something I like but isn’t ‘hell yes’. Even if it’s a bargain. I only want ‘hell yes’ in my life. There’s a saying amongst some of my sewing friends, which is ‘there will always be more beautiful fabric’. And there will. So it has to be pretty special to cross over.
It’s also made me think more about my stash, which has plenty of fabric that I don’t feel ‘hell yes’ about, especially stuff from the earlier days. And that’s made me decide to do a destash of sorts; I’ll probably sell some bits, but I will also take part in fabric swaps. Something I’ve learned is that it doesn’t make me happier to have fabric that I don’t love. It weighs me down.
4) I’ve reflected a lot this year on what is in my stash, including fibre contents. I’ve learned that there are some fibres I love, and others I hate, and I should categorically not buy those which I hate – even if they’re pretty.
The big one here is polyester. I’m not averse to synthetic fibres as such, but I have a lot of cheap poly in my stash. Being more reflective this year has meant that I’ve noticed how poly jersey often wears poorly over time, and how I hate the feeling of polyester clinging to my skin.
Another one is linen – I actually don’t dislike linen at all, but my issue with it is that this year I’ve realised that I don’t particularly like how linen wears on certain garments. I have a pair of trousers I made that I love, but which bag out hugely with wear because they’re linen. So to have them look the way I want to, I’d need to wash them every wear. Which is not sustainable nor good environmentally. So those trousers are now house trousers, and that’s fine, but it’s not something I’m likely to repeat.
On the flip side, I’ve realised this year that viscose is my jam. I reach for viscose garments much more readily than cotton or poly. It’s breathable and drapey. I love viscose jersey, viscose challis, viscose lawn.
So my big lesson is: don’t buy poly, do buy viscose, and probably don’t buy linen. And with time, I’ll learn how I feel about even more fabrics.
5) I have really focused in on what I choose to wear and why. I’ve taken note of the colours I keep reaching for, the prints I love to wear, and the plains I need to coordinate.
Before this, I often shopped with an ‘Ooh pretty’ mentality. I saw a fabric that was beautiful and I wanted it. But often, that fabric was beautiful but just not for me, and I was confusing my appreciation of it being a gorgeous fabric with whether or not I would actually use and wear it.
The best way I can describe this is that I recently saw a beautiful floral Liberty silk satin. It was a bold print, which I love to wear, and it was in bold bright colours. It was one of those things you see in someone else’s basket and you go ‘oooh that’s gorgeous, I want that’. But I kept looking at it and thinking how I’d wear it, and I even decided on a pattern combo. But ultimately, there was a repeating background detail that meant I likely simply wouldn’t wear it – it was too busy for me, in a really small way that many people wouldn’t have even noticed. But I would have. Before the ban, I would probably have bought it impulsively and thought no more. Post ban, thinking reflectively has saved me money and unwanted fabric.
Conclusions
I think it’s pretty clear that I feel overwhelmingly positive about the ban. It might seem like a drastic measure to some, but I wanted to challenge myself to totally reset my habits and get some clarity, and I didn’t think I could do that without some sort of circuit breaker.
I think I’ve had a more thoughtful, cohesive and sustainable sewing practice as a result. For the first time, I think I’ve appreciated the scale of what I have, and the scale of what I can use and consume. I’ve realised that fast fashion can and does cross over into sewing, particularly with FOMO purchasing, and I’ve found that opting out of that has meant that I’ve shifted focus to projects that aren’t necessarily a quick easy sew but fit my needs.
Would I recommend it? Absolutely. Even if someone doesn’t go on a fabric ban, I recommend other aspects of my year, like tracking. It won’t be for everyone and I think you have to take from it that which is useful for you. I needed a different approach to my sewing, and that’s what it gave me.
When I bought RTW, I almost exclusively bought garments I could pull on over my head. I hate zippers. I find them difficult to use (especially back ones), they get stuck, and the teeth can get out of shape easily and then your garment isn’t wearable. I also tend to find very fitted bodices with zippers uncomfortable. So I decided to make my next dress, a By Hand London Flora, with a shirred back and eliminate the zip entirely.
Another perk of this hack is that it reduces the need for a lot of fitting. I typically have a broad back relative to my shoulders, but the shirring eliminates any need to make adjustments because the fabric can stretch to accommodate my broad back. It also is extremely beneficial for times where my measurements fluctuate, as the fabric can give and take accordingly. And it’s comfortable! I can eat a huge meal and not feel like my waistband is too tight.
So how to go about this…
I’d seen many posts on instagram where people move the zip to the side and add shirring to the back of dresses, but I wanted to remove the zip all together. This meant that I wanted to maintain the fit of the dress (which has a fitted bodice) but it also needed to have a wide enough circumference at the waist to accommodate my bust, so it could be pulled on over my head. But I didn’t want to just increase the waist circumference and elasticate the entire waist, as that wouldn’t maintain the fit of the bodice.
Enter shirring. I realised that I could add a shirred panel just to the centre back of the dress, which when expanded would result in a large enough circumference to fit the waist of the dress over my bust (my widest point). This wouldn’t affect the fit of the front or sides of the bodice at all, and it wouldn’t affect the back darts. This was the easiest way to add width without affecting the intended fit of the design.
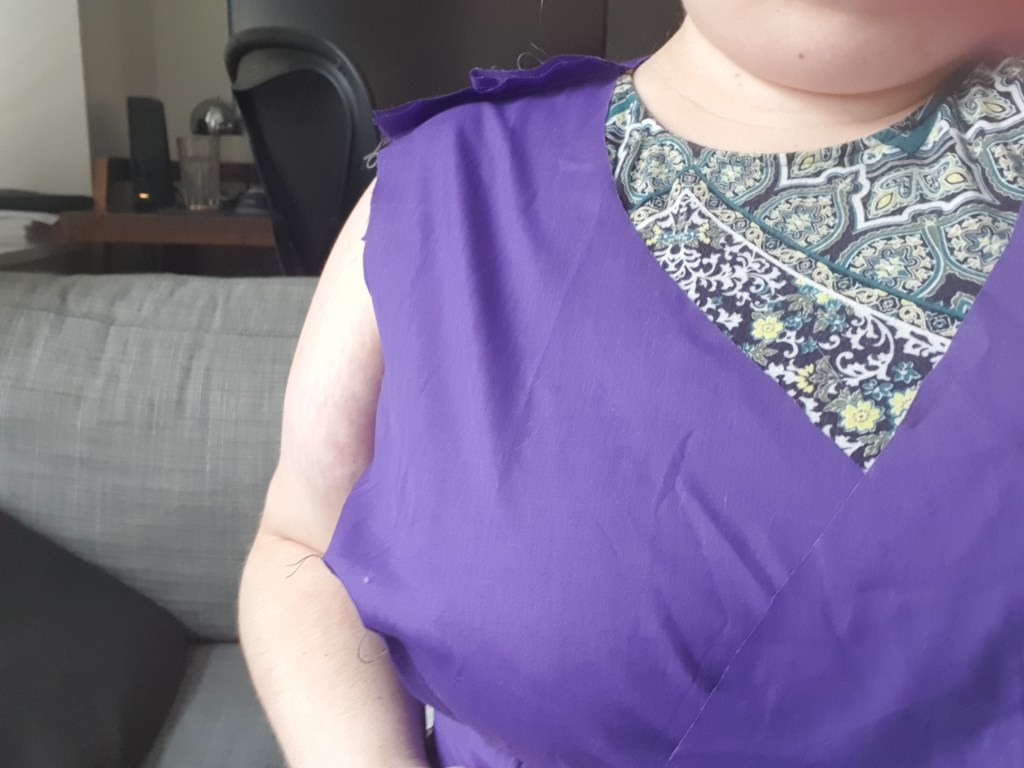
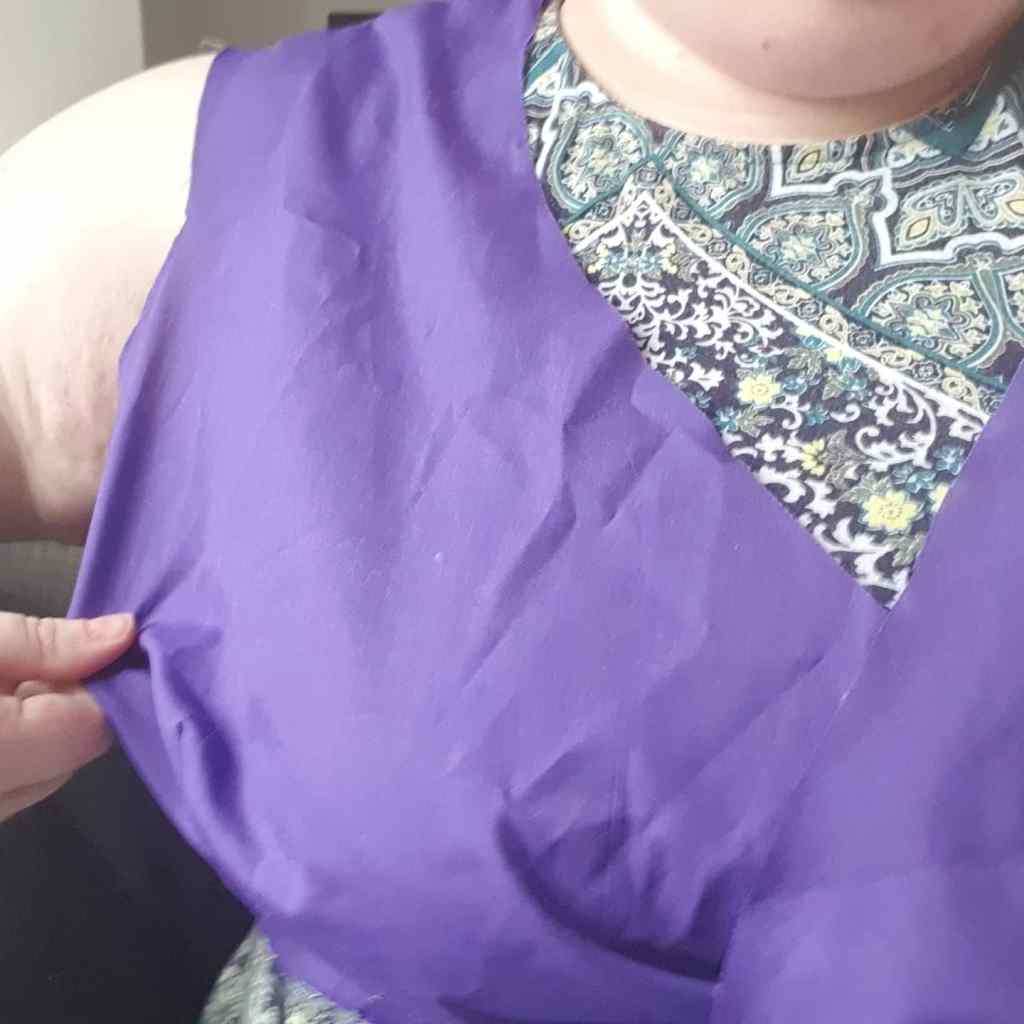
The original back bodice piece, designed to have a zipper down the centre back.
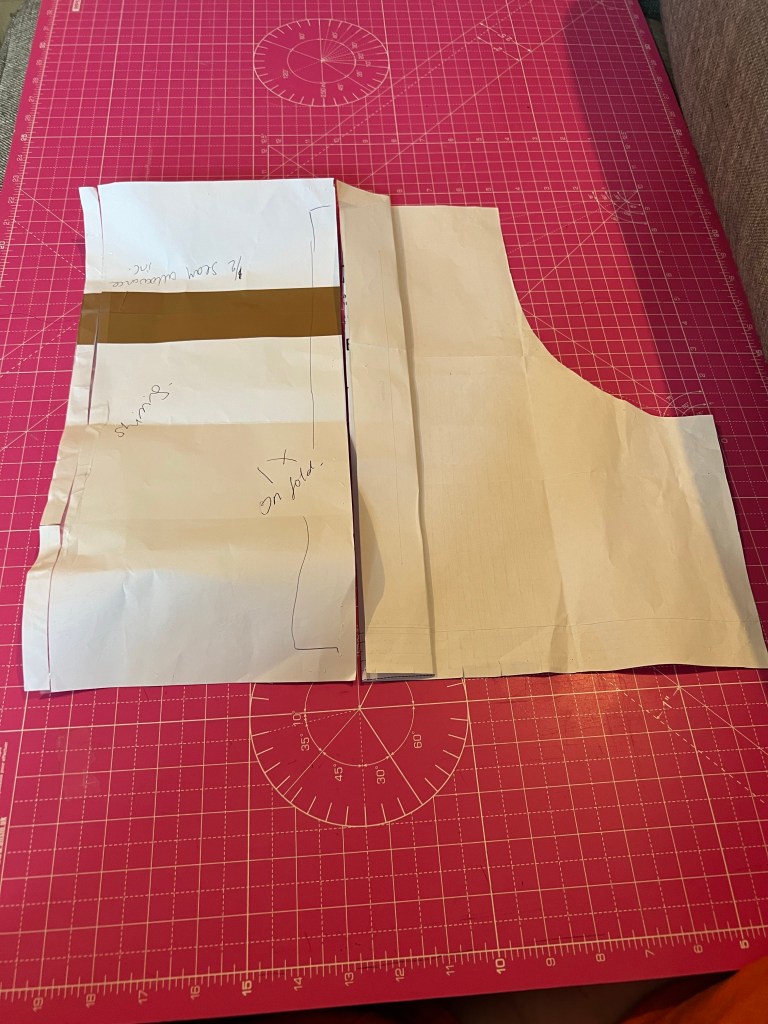
To make this work, I did the maths: my waist was 47” and my full bust was 53”. I therefore needed to add an additional 6” to the waist of the dress (plus one or two extra for comfort) to get the dress on over my bust. Shirring fabric should ideally scrunch the fabric up by 50% (i.e. a 10” wide piece of fabric should measure 5” wide when shirred). I took the back bodice piece and cut a vertical section 3” in from the centre back seam. I then drew a new piece, which was 12” wide (so this is the 3” I removed from the back bodice (x2 for each side), plus the 6” extra I needed) and added 5/8 seam allowance to each side. This meant I had a piece that was 13 2/8” wide, but would shir at a 50% ratio to be the exact same width as the originally drafted bodice.
I folded out a 3” wide section from the centre back, where the zip would have gone. I then drafted the piece on the left, which is 6” plus seam allowance. It is cut on the fold, so the final width will be 13 2/8”. That piece of fabric will then be attached to both the left and right bodice pieces.
I then started to think about the skirt. The shirred part of the bodice was also going to require partial elastication of the waist (as if the waist wasn’t elasticated, it would be impossible to get the waist over my bust). This meant that the section of skirt attached to the shirring would look as if it were a 2x gathered skirt. I decided that the easiest option was to just replace the skirt included with a gathered skirt, at a 2x gather ratio. For the non shirred parts of the bodice, this would be achieved normally by gathering the skirt fabric and sewing the gathers in place. For the shirred part of the bodice, I would shir the part of the waist seam connecting the bodice to the skirt. That would achieve partial elastication of the waist.
I simply calculated the front and back waist measurements of the finished bodice, doubled them, and cut rectangles of those widths (eg the front waist was 26.5”, so I needed a rectangle of 53” width; and the back waist was 29.5” so needed a rectangle of 59” width).
The shirred panel with the partially shirred waistband. It makes the skirt look gathered because of the shirring, so I drafted the skirt so that the rest of it was gathered throughout.
This meant that the dress looks just as fitted as a BHL Flora made with a zipper, without sacrificing any of the fit. Hurrah!
I don’t have a good photo yet, so here’s a placeholder to show that the bodice fits just as it would have done with a zipper.
I hope this helps anyone else wanting to make a similar hack! Because of the partially shirred waistband it only really works with a gathered skirt (as the skirt will look gathered in that section, because of the 50% shirring shrinkage), unless you’re happy to use another kind of skirt and have gathers just in that section. If that’s the case, you’ll need to modify the back skirt piece(s) to add in the width that you’re adding to the bodice. So in my case, if I had wanted to use the Flora circle skirt, I would need to modify the back skirt pieces to add in the extra 6” so that the back bodice and skirt pieces lined up.
If you have any questions about the method I used, just let me know and I’ll try to help!
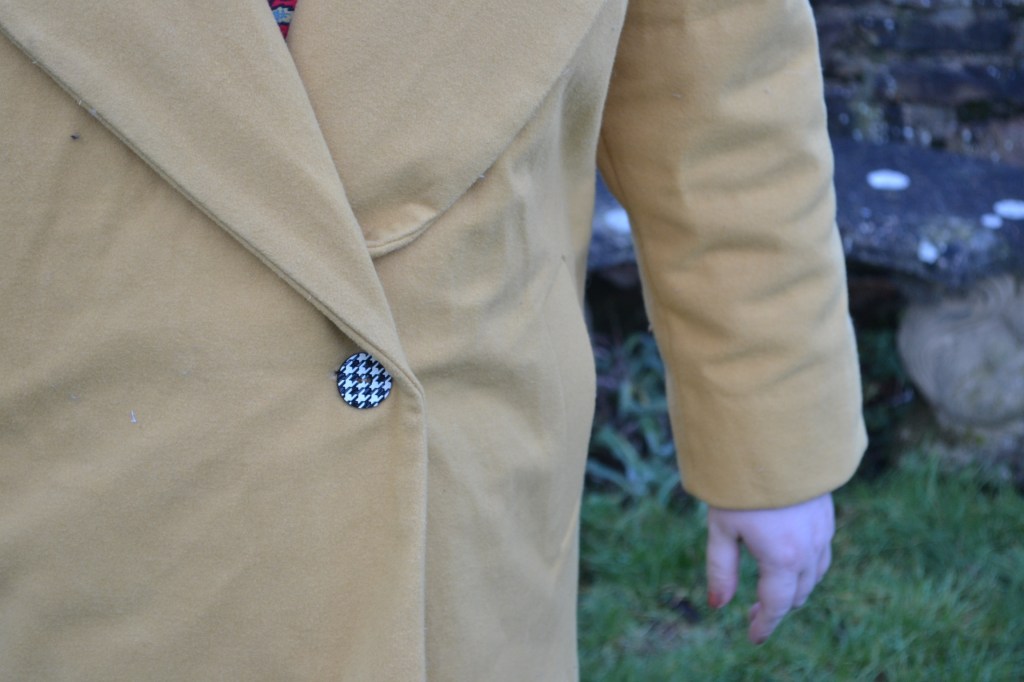
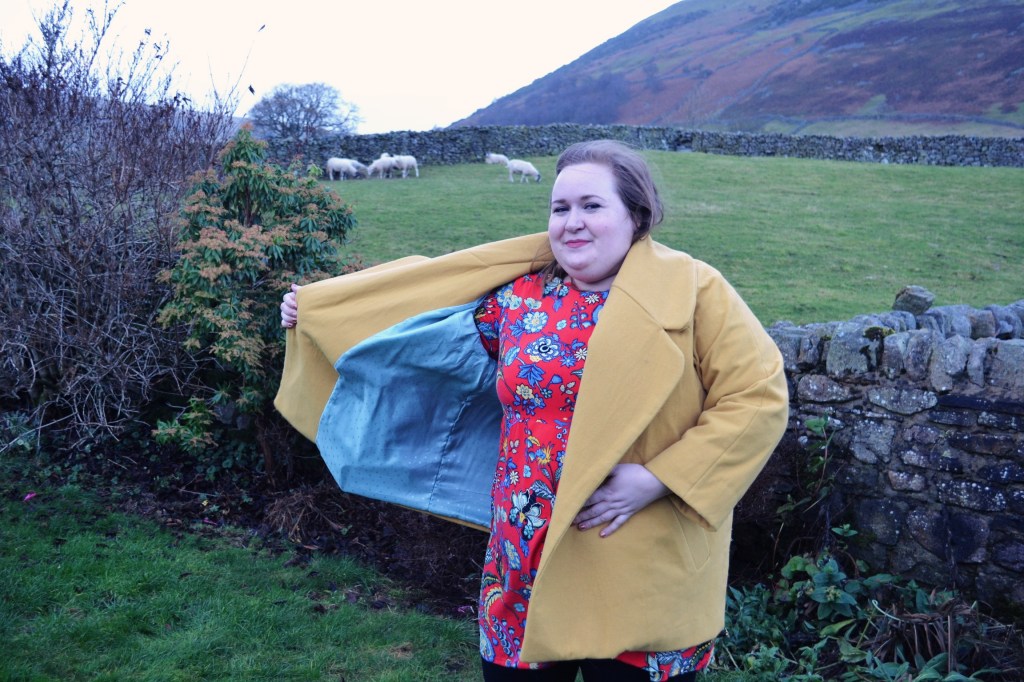
PR: I was provided the mustard vegan wool coating fabric by The Sewist Fabric Shop to make this coat for a paid guest blog post. I am under no obligation to write this post and will not receive any payment for writing it – it is an independent pattern review. You can read my guest blog post here, where I discuss working with the fabric.
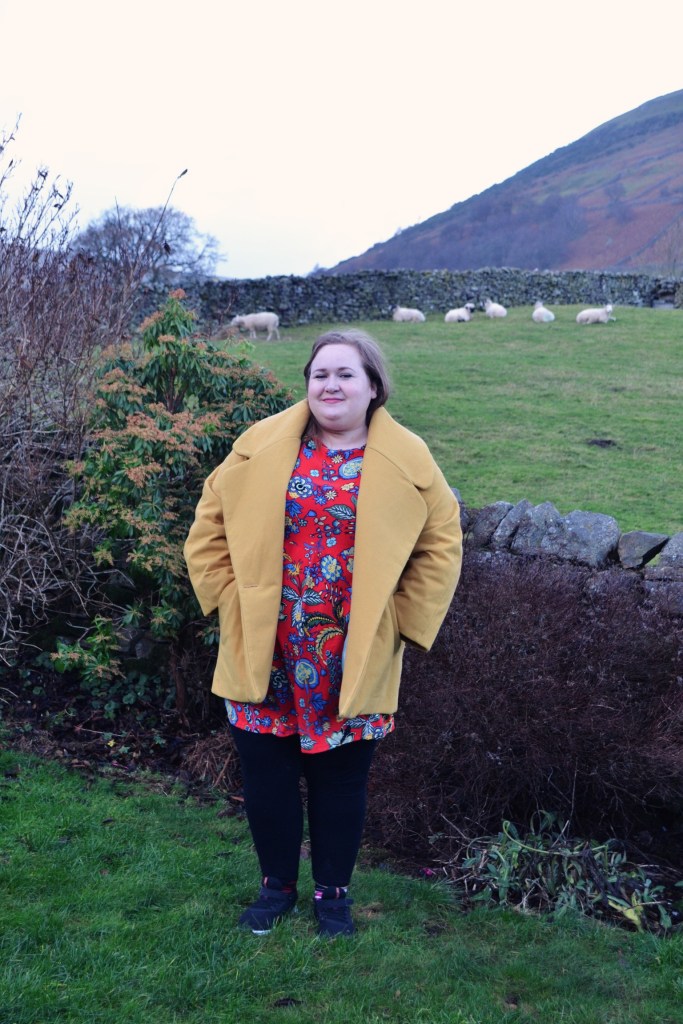
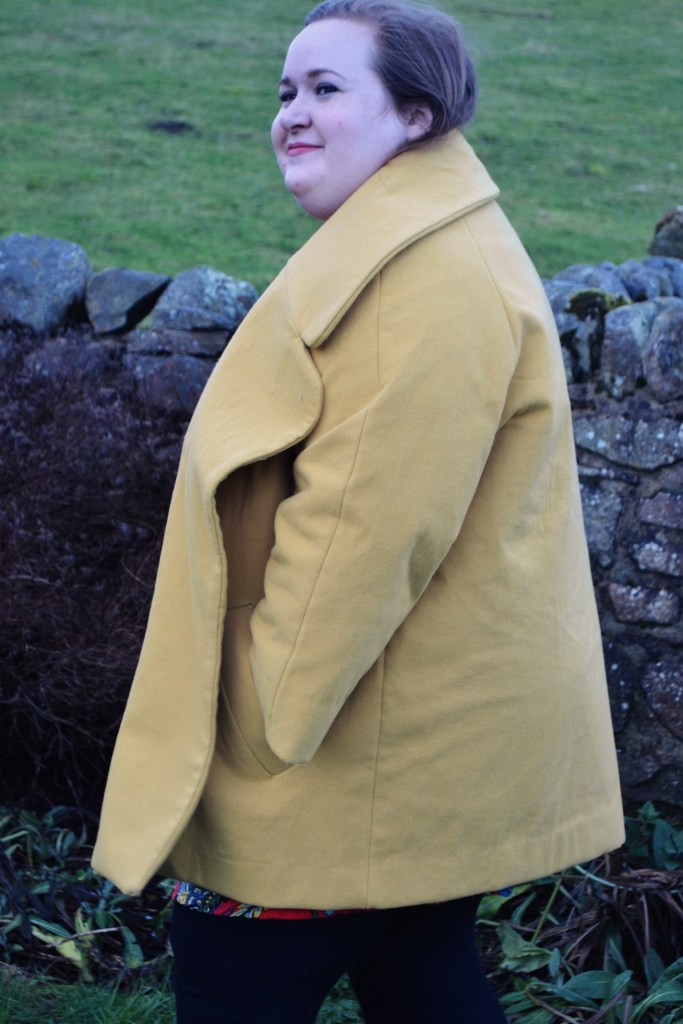
This project marked an escalation in difficulty for me; I’d sewn one coat before but it was a very simple pattern with a cocoon fit and dropped shoulders, so there wasn’t a lot of fitting to worry about and it was very forgiving of mistakes. This pattern has raglan sleeves, an oversized collar and lapels, welt pockets and is fully lined. It’s a relatively involved project – it’s the longest and most complex project I’ve undertaken – but thanks to the oversized design with lots of positive ease, fitting isn’t really an issue.
The pattern
I chose this pattern because I was looking to make something similar to the Max Mara cocoon coats: something in a solid colour, oversized collar and lapels and button closure. The size range is good – the size chart goes up to a 62.8” hip but the finished garment measurements go up to a 75.6” hip – so if you’re sized out based on body measurements, it may still be an option due to positive design ease. I actually chose to go down 3 sizes from the recommended sizing after looking at other people’s makes using the #TFSPoppyCoat hashtag and I’m happy with that fit. I chose to make the shorter version as I was concerned about where the longer length would sit on me as I’m 5’4” and it is a very oversized pattern!
I cut a straight size 20 to begin with and during the sewing process modified it to take the sleeves up by 1”. By doing it this way, my sleeve opening is slightly wider than intended, as the ideal way to make this modification would be to the pattern piece by shortening mid sleeve – however, I decided to make this mod at the point of attaching the sleeve lining to the cuffs and had to improvise.
The process
At the outset, one very good thing about this pattern is that there is a detailed sew along with photos. I made the Poppy using both the instructions and the sewalong, as there were points where I didn’t clearly understand what to do using just the instructions. At this stage, that could be because I was doing many things that were brand new to me rather than poor instructions, and if you use the two together then it’s very clear. You can’t just use the sewalong though as I found it did omit one or two steps that were in the instructions. Another feature of the sewalong that I found especially helpful was that it divided the sewing into pragmatic chunks with good stopping points – I found that I worked my way through it one part at a time, and had a break between each part. It really helped with a sense of progress and scale, and stopped me from feeling overwhelmed.
Generally, I found that I managed the new-to-me techniques quite well with the level of detail of the instructions. It was the first time I’d ever done welt pockets and I’m pretty happy with them in general (and over the moon with them as a first timer!). The collar was trickier – I followed all of the instructions and it came together very easily, but found it a little bit fiddly sewing the upper collar to the lapel right in the corner of the join; it took a few goes to get that right.
I did make one deviation from the pattern when it came to the collar – after finishing the construction of the collar and attaching the outer shell to the lining, I found that whenever I hung my coat up by the hanging loop, because the under collar wasn’t sewn internally to the upper collar, it opened up and bagged out. I consulted some friends about this and on their advice I added the step of sewing the seam allowances of the under collar and top collar together, which resolved this issue. The pattern does suggest you sew the outer shell and facing together at the raglan shoulder seam at a later stage, stitching in the ditch, and I didn’t do this as sewing the seam allowances together meant my outer shell was very securely attached to my facings and wouldn’t move around.
Another deviation was that I chose to bag the coat out through a hole in the side seam of the lining rather than the sleeve. This was because I wasn’t confident that I could actually bag it out through the sleeve, especially with the structure of the coat due to the interfacing.
I also did a hand-sewn buttonhole for the first time as the width of the button recommended exceeded my machine’s buttonhole foot. I absolutely winged it without looking up how a buttonhole should be hand sewn, and then got a book on tailoring techniques for Christmas that taught me that there is actually a technique and specific thread should be used. Oops! But it feels like a good start for a first buttonhole and I’m more confident about sewing my own ones again in future.
Thoughts after wearing the finished garment
After wearing the coat several times, I do have some thoughts. In the shorter length the pocket bag hits the bottom of the inside of the coat. What this means is that if you have bulky items in the pockets (even a phone) then the bottom of the coat bulks out and you can’t keep the nice crisp fold at the bottom hem. This may also be because when I slip-stitched my facing, I wasn’t able to get all the way into the front corners of the coat, but I slip-stitched as far into them as was physically possible for me (and if you did manage to slip-stitch further it would mean the pocket bag wouldn’t be able to be fully extended). I think this is a drafting issue but it could be remedied by shortening the pocket bags, which are generously deep anyway.
I also made my coat by interfacing every piece and using a medium weight fusible interfacing, following the normal maxim that the weight of interfacing should match the weight of the fabric to be interfaced. This isn’t something I’d do again. It’s made my coat very structured; in this instance, it’s a happy accident as the structure works quite well with the fabric and gives it quite a mod A-line look, but I wouldn’t want that for the longer length coat or for other fabrics, and it has made the collar and lapels quite stiff – I suspect with more breaking in they may eventually settle, but at the moment they don’t really want to stay flat. I’ve since discussed this with other sewists who have suggested weft interfacing and some research into tailoring techniques suggests sewing in hair canvas is the way to go, rather than fusible interfacing. I think it would have been helpful if the pattern specified a weight of interfacing (probably lightweight) as the weight will drastically affect whether it’s a soft, drapey coat, or a crisp, structured one, and that information is especially relevant for beginner sewists who won’t necessarily know about how interfacing will work in tailoring (like me!).
Things I would do differently
I do plan to make another version of this coat as I really enjoy the collar, the oversized fit and the welt pockets. It’s a fun project to put together. But there are a few things I will do differently. At a pattern level, I’ll shorten the sleeves the right way by 1” and I will also make a square shoulder adjustment as when the coat is done up the collar is raised above my neck, rather than sitting on the neck. This is a standard adjustment for me though, and not an issue with the pattern drafting.
I’ll also go with different interfacing, likely either weft interfacing or I might try hair canvas. I think whatever I choose, I’ll experiment with interfacing some swatches to get a better idea of how it will affect drape and structure.
Overall, I’d give this pattern an 8/10 – I love the style lines and the sewalong is very helpful, but it could be improved with more guidance about interfacing and the pocket bag depth issue bothers me (although that’s a very easy fix for next time or wouldn’t be an issue for a longer length version).
Recently, I was trying to explain what would be involved in self-drafting and sewing a particular type of garment to someone, and it made me think about how much I’ve learned in my first year of sewing garments. And then I thought, if I could write a letter now to go back in time and give to myself when I started sewing, what would it look like? What would I want to tell myself or any other novice garment sewist?
This is part one of a series, as this first point is quite a long one!
1. Start with a basic machine.
Everyone has to start with some kind of machine (eventually – you can get quite far with hand sewing, I’m not knocking that). My first ever sewing machine was bought secondhand from the free ads paper. I don’t remember what it cost, but it was likely about £20. It was a 1960s/1970s basic workhorse machine – it had a handful of stitches, so I could do straight or zigzag, and it was great. I didn’t really get into sewing beyond making some tote bags and an art project, so it got donated or sold on sometime after 2004.
My next machine was a Brother LS14, bought in 2014 primarily because it was within my budget (at the time, the LS14 was approx. £80) and pretty. I’m not going to lie, the decorated fascia was a big part of it. I’d done very little research, but I knew from my previous limited experience that I needed basic stitches and I wasn’t contemplating anything too advanced. I made some cushion covers as a gift for a friend, then boxed it away and never got round to taking it further, although I impulse bought an overlocker in 2015 (a Brother 1034d).
Then the pandemic hit in 2020, and I had both my machines shipped to me and started sewing with gusto. I sewed with my Brother LS14 until Feb 2021, when I upgraded to a Pfaff Quilt Ambition 630. But during the time I had my Brother LS14, I sewed: dresses, elastic waistbands, buttonholes, outerwear (including a wool coat), a bag, t-shirts. There was nothing I couldn’t do with it, because ultimately, all you really need to sew clothing is a straight stitch, a zigzag stitch, and a buttonhole stitch. An overlock/overcast stitch is nice to finish seams.
Sewing is an expensive and time-consuming hobby. As someone who is very invested in it now, I had a couple of false starts before I really got into it. I’m glad that I started with an entry-level machine and didn’t jump straight to buying a fancy one. If I didn’t take to sewing, then I hadn’t lost as much money. If I really took to it, then I could upgrade if I actually needed to at a later date.
This point about upgrading is key; I had a good enough machine that I could sew quite frequently on it for 9 months whilst I learned. I started to outgrow it after a few months and wanted additional features. By doing things this way, I was able to learn as I went with regard to what features I wanted to have, and what things frustrated me about my current machine. This meant that I was in a much more informed place to research what machines I wanted and why. I can honestly say that if I had gone in for a higher budget machine from the start, I would have probably bought an entry level computerised machine that had 500 decorative stitches but didn’t have all the features that my current machine has. Because when you’re starting out, you don’t know what’s important to you. And if I had spent that much money already, I would have found it hard to justify upgrading to the machine I have now.
Do you have any thoughts about which machines are best to start out with? I’d love to know what you think.
(Pattern bought with my own money; 100% honest opinion as always.)
I love a wrap dress. I always have; there’s something about the simplicity of it that I really love, whilst also being a genius bit of engineering. The lack of fastenings like a zip or button also make wrap dresses fantastic if your measurements are prone to fluctuation and (for me) result in a more accessible garment. I also love how a wrap neckline looks on me – I feel confident and body positive in them.
I made the BHL Hannah last year and then redid the bodice when I wasn’t happy with the initial fit. A short while after redoing the bodice, I realised I still wasn’t happy with the fit; primarily because I had enough gaping that I had to wear a cami top underneath, and also because it felt overfitted in the shoulders and upper back.
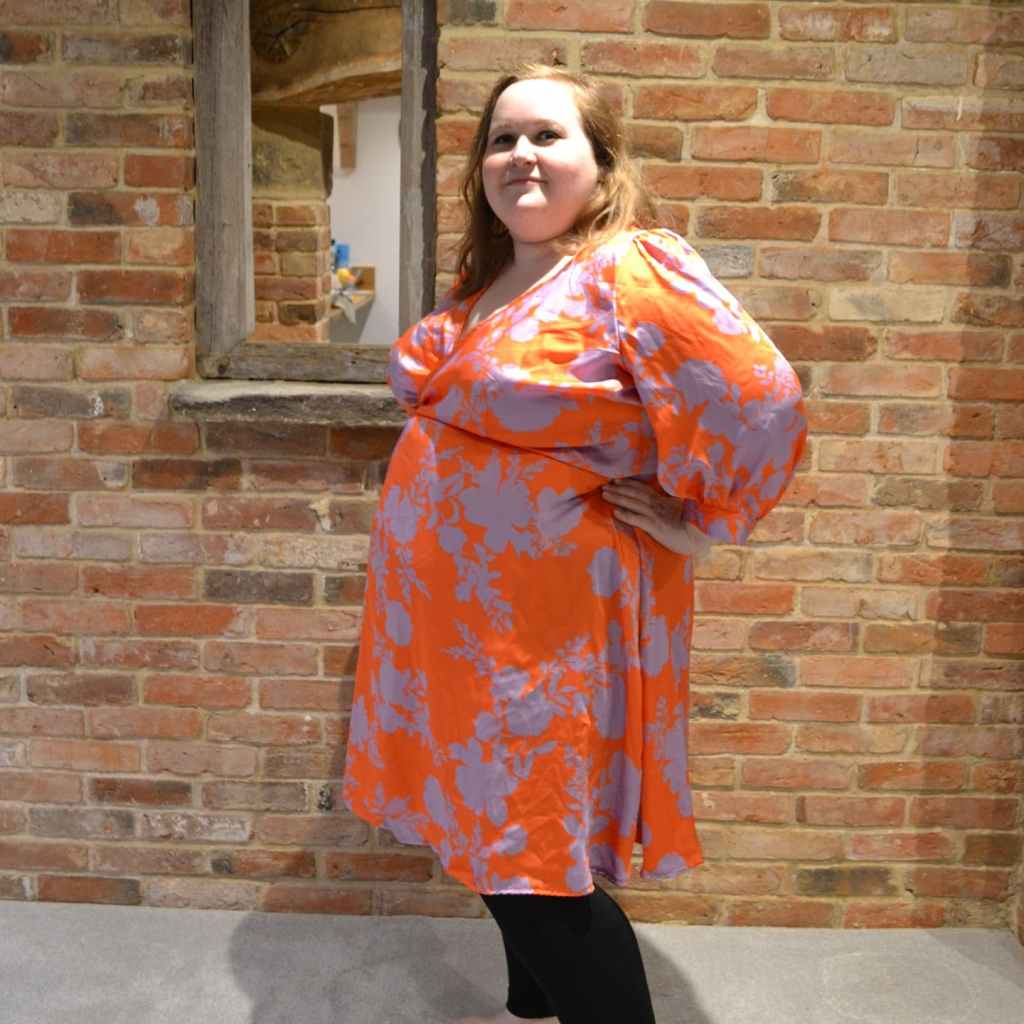
My general experience with indie patterns is that my body doesn’t always suit their block, so I will often look to take pattern pieces from patterns that better fit my body to recreate the look. A good example is my experience with the Tilly and the Buttons Indigo, where I had so many issues with the bodice that, after eight toiles, I gave up and used a Cashmerette bodice instead (which took one toile). So when Cashmerette announced the Roseclair, I was extremely keen to try it and see whether it worked better for my body.
And it did! I used their size calculator as always, and made an initial cotton toile on the recommended size (22 G/H with a 1″ FBA, graded to a 26 at the waist and hip). Based on that toile I moved the darts to match my apex, and made a wearable toile in double gauze. I haven’t provided photos of the double gauze version because, yet again, crinkly double gauze bested me and the garment has grown about 3 sizes through wear. I’ve made some basic alterations to make it more wearable, but it’s a house dress for now (although I hope to redo the bodice so it can be a final garment).
The pattern is, as Cashmerette patterns usually are in my experience, well drafted and with good instructions. It fits me far better than the BHL Hannah with minimal alterations, and I may compare pattern pieces to look at why that is and understand more about plus drafting. It has more coverage and the neckline was less prone to gaping, although after my double gauze toile I did remove a further 4cm from the neckline to reduce gape. This is because the waist was sitting at my underbust (my narrowest point) and therefore it needed shortening. If my natural waist was my narrowest point, I think it would have sat perfectly.
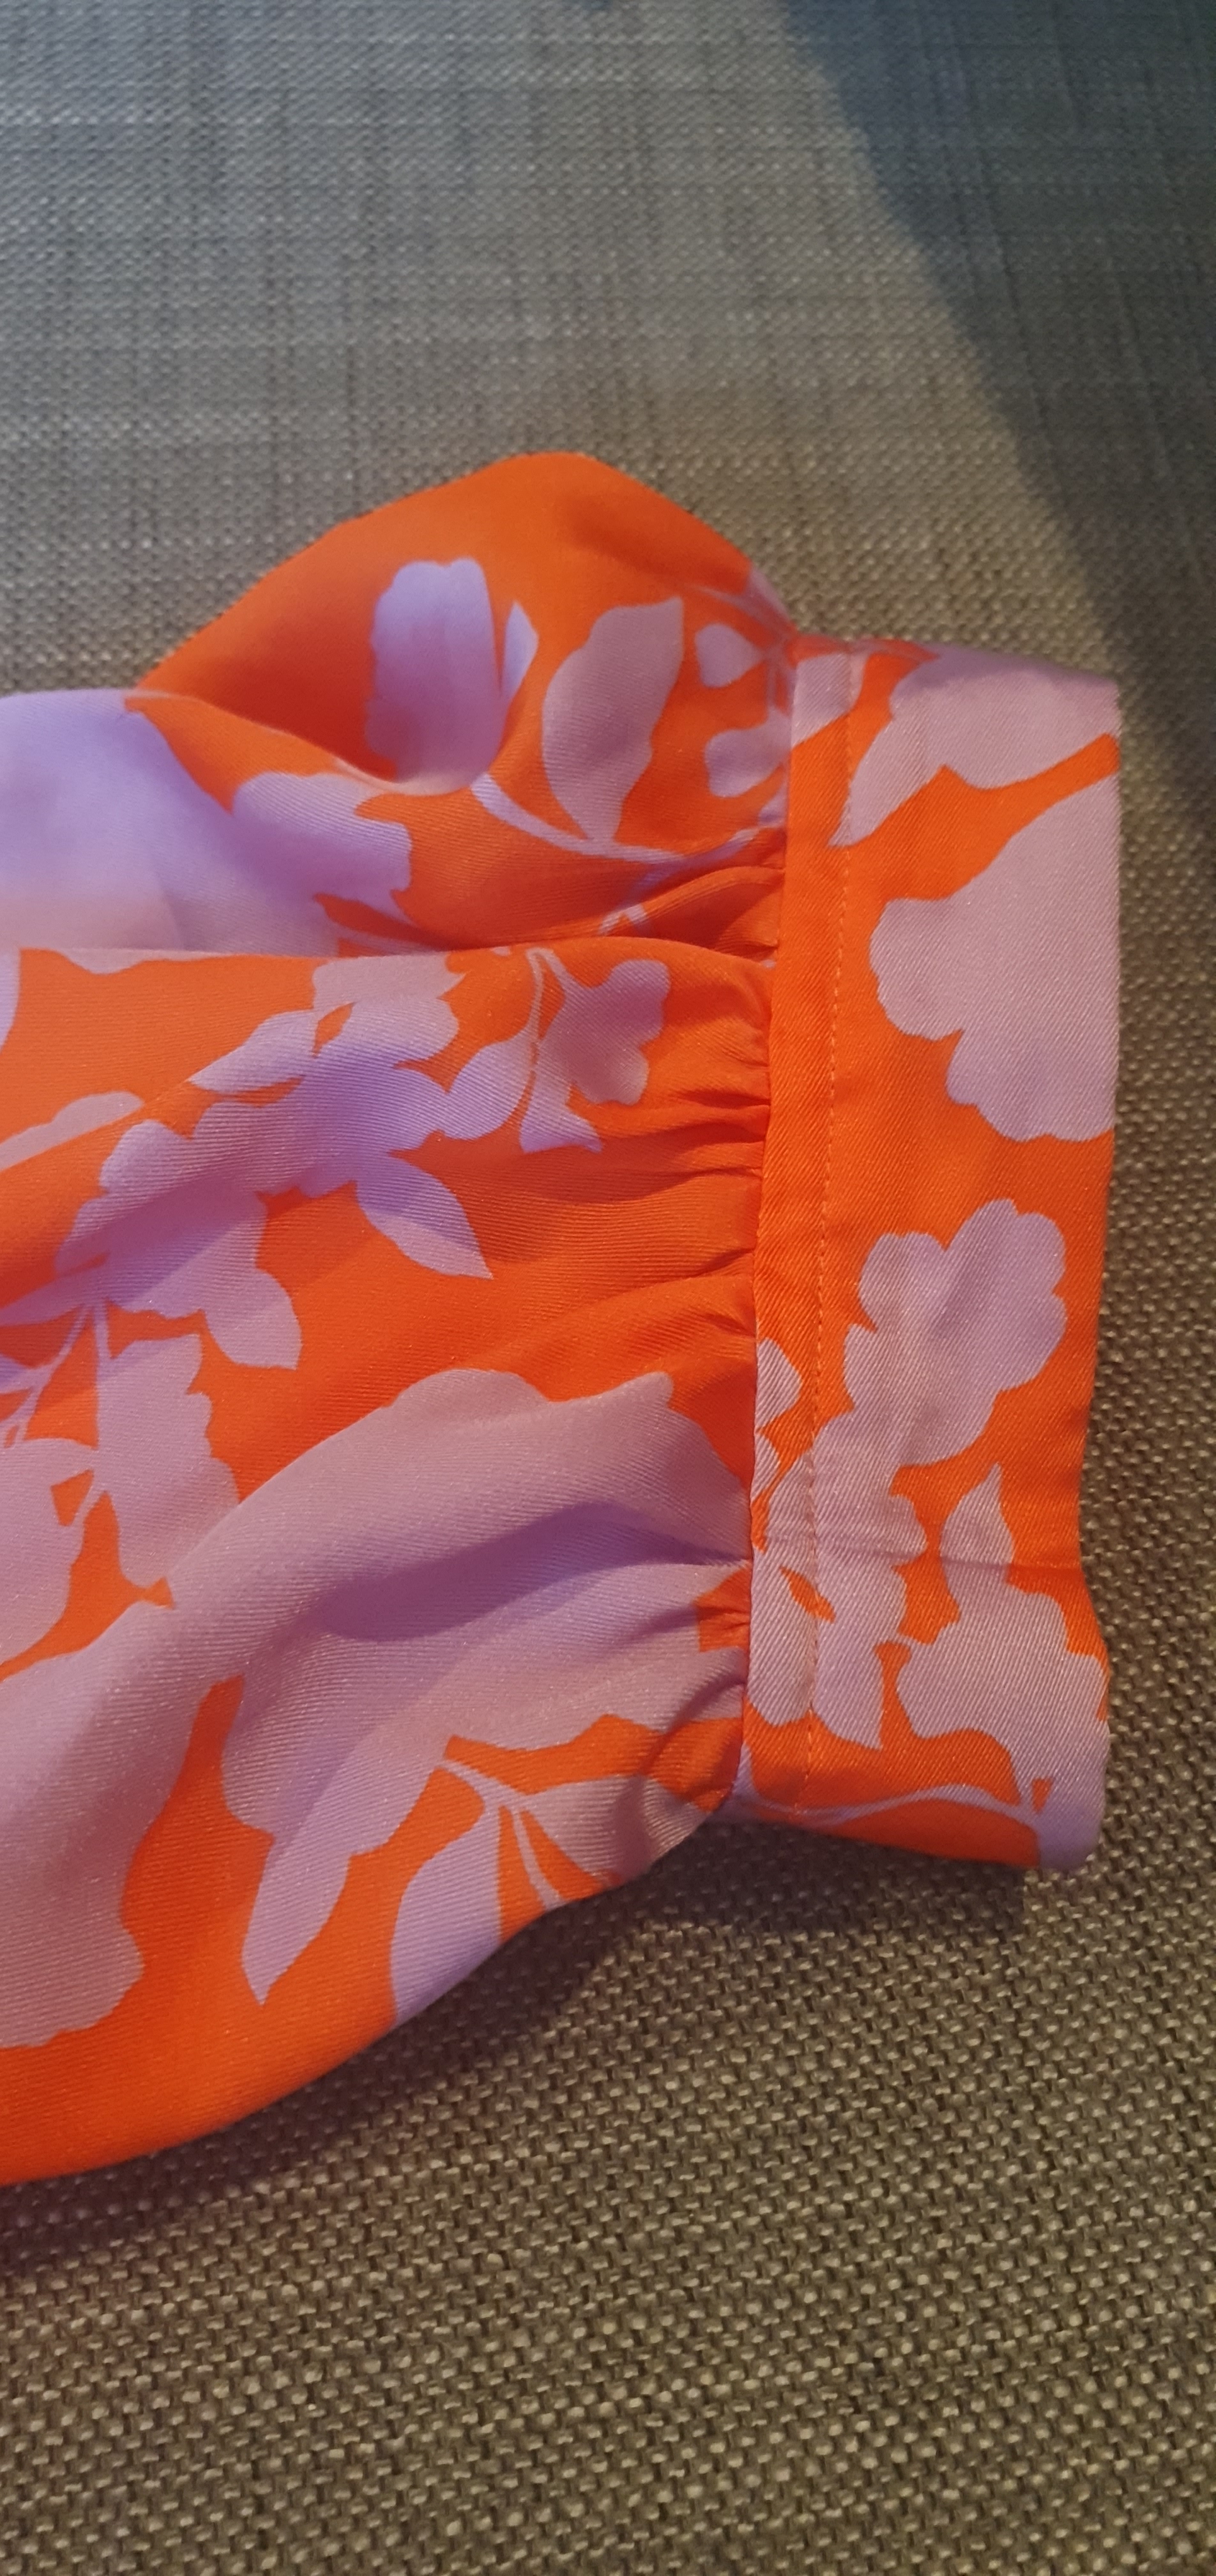
The pattern uses bias binding on the neckline and this extends into two of the ties, which is a nice touch. I originally intended to use self-fabric but was tight for time and the size of the strips in the pattern were too narrow for my bias making machine and I couldn’t be bothered to manually make the bias, so I next day-ordered some tangerine bias binding that turned out to be a great match. This did mean I’d already attached the ties in the bodice side seam in self fabric, whilst the neckline ties were in tangerine satin, but I don’t think it’s too awkward. Everything was extremely straightforward; the only change I would make to the pattern instructions would be to sew the cuff closed closer to the seam line so it’s less obvious.
Cuff with recommended stitching distance; I’ll bring this closer to the seam next time.
My fabric was a polyester satin from Rainbow Fabrics and is deadstock River Island. As soon as I saw the fabric on their site I jumped and ordered 5m, as I wasn’t sure what I wanted to make, but knew I wanted something special to show off the gorgeous pattern.
I tried to do a decent finish on this dress, within reason – I was sewing it until 2.30am on the day that we were due to go away for a family birthday (to which I intended to wear the dress), so some bits are a bit shoddy, like the hem, which I intend to redo with a rolled hem rather than a folded hem. I did, however, French seam everything but the armholes and waist seam, which I bound in the tangerine satin bias binding for a luxurious finish.
I wore this dress for two special occasions and felt fantastic in it. I also received my first ever compliments from two strangers in the street, who said they loved it, which absolutely made my night!
Conclusion: excellent pattern, will make again for sure (I have more planned – including MORE double gauze).
So in my last post I wrote about basically starting again with my wardrobe from scratch, as I had very few items that fit me, and I identified some gaps that I wanted to work on.
For pretty much the first time ever, I’ve followed through on my plans. In the past I’ve tried #makenine, I’ve tried jotting plans down with croquis in my sewing journal, and I typically find that I don’t follow through. It isn’t because I change my mind, but usually I get distracted by the next sewing idea (think “ooh, shiny!” levels of attention span) and the plans mount up.
So, how did I get on?
Since writing that post I sewed up a Tarlee tee in different sizing and I think that’s a T’n’T pattern for me now; I’m really happy with the fit throughout and it works perfectly in viscose jersey. I also sewed up a pair of Style Arc Barry pants, which were a shot in the dark using stash fabric, but which I’m really happy with; and I sewed two Cashmerette Roseclair dresses: one as a wearable toile, another as a final garment. Posts on those to follow when I get pictures. I also almost finished my SOI Sorrento jacket (it just needs buttons and waistband tabs).
Those five garments have really filled in some wardrobe gaps for me, to the extent that I was able to take a capsule wardrobe almost entirely consisting of handmade garments on holiday with me for a week. The only RTW I took was underwear, socks, swimwear, leggings, two tank tops and a pair of casual woven pants that are on their last legs and I plan to recreate at home. I don’t yet sew underwear or swimwear (or socks), so that’s a pretty good capsule!
So what was different and why did my plans work out? I think there are a few reasons:
1) I looked at my wardrobe, at what I wear, and at what I don’t have but I would wear. The Tarlee tee is a good example: I love my Tarlee tees and I wear them a lot, even though they’re a little small in the shoulders now. The Barry pants are another example, although I only wore them briefly; I know that I currently wear and enjoy wearing woven casual pants with elasticated waistbands, so I made something that fit in those parameters.
2) I also chose to make garments that could be worn year-round. I am beginning to really believe in transitional pieces as a priority (at least whilst I have a limited wardrobe to choose from) so that I don’t enter a new season and find I have barely anything to wear. Once I have a solid basis, then it will be time for seasonal garments.
3) I made short term plans. Attempting to plan far in advance (like with #makenine) is tricky for me because I’m easily distracted and my priorities change. I still want to make the things that are on my 2021 make nine, but they’re not priorities – at the time I thought hard about long term goals and advanced projects, rather than about reasonably making what I needed as I needed it. I think I put three coats on, for example – I’ll be amazed if I make more than one or two this year because there is so much more that I want to make and need in my wardrobe.
4) Taking (3) a step further, I had some really short term goals that focused me. I knew I was going on holiday, and I knew that I wanted new garments to choose from on that holiday. I wanted pieces that I could mix and match with existing items to get more choices, and I knew that I wanted a new smart-casual outfit. I also knew that we were going to be celebrating a special family birthday and would likely be dressing up one night, so I specifically planned a dress that I thought would meet the fancy requirements (and I’ll post separately on this dress later, as it was a journey and I’m very pleased with it!).
Once I have photos, I’d like to share my capsule wardrobe (at least the handmade items) because I really did feel prepared for almost every eventuality, and I had plenty of items that didn’t get worn. But I now feel a lot less anxious about the state of my wardrobe as I now know that I have good building blocks to work with.
It seems fitting to write about this now as it’s very much on theme with making my way to a handmade wardrobe, which is my ultimate goal.
Recently I went on a few decluttering sprees. One of these involved tackling my clothing. I own a lot of clothing, not least because my body measurements fluctuate frequently, so I have a reasonable wardrobe of garments to fit each of those different measurements. The problem is this adds up to a LOT of clothes!
Over the course of the pandemic and my illness’s relapse, my measurements have fluctuated again and I realised that the clothes I was wearing most were my handmade clothes. A little bit of this is that those are more meaningful items, but a large part is that those are the items that are most comfortable and fit me the best. Items that feel tight, restrict my movement, or weigh me down have been put to one side.
So I tackled my wardrobe and donated what I knew I wouldn’t wear anymore, and put into storage the things I loved for another day, in case my body fluctuates again and they fit in future. I removed everything that doesn’t currently fit me.
That left me with very little; it left most of my handmade garments, a couple of pairs of RTW leggings, and a couple of RTW t-shirts and tanks. You might think this makes dressing difficult, but I’ve kept everything I’ve been wearing recently – it’s just that I had been cycling the same few garments over and over.
I choose to see this as a rare opportunity to start my wardrobe from scratch. To remove the white noise and baggage of garments that I’m not wearing, whatever the reason, and to take a streamlined look at what I have and what I need. To focus my sewing.
As a result, I’ve identified some things I want to make, and some of those have a higher priority because they’re staples.
Here’s my list so far:
1) Some t-shirts. I want a couple of Muna and Broad Tarlee t-shirts with a 3/4 sleeve to take me through autumn and winter. I’ve picked a yellow viscose jersey and a striped rib knit. I’ve also been toiling the Sew Over It Audrey top and I’d like to be able to have one or two of these in my wardrobe.
2) Some trousers. Right now I don’t have any beside joggers/loungewear! I’m planning a pair of Helen’s Closet Winslow culottes (maybe 3/4 length); a pair of Style Arc Barry trousers; and I want to knock together a pair of trousers for when I’m back at work in person – I’m thinking Muna and Broad Glebe, Willandra or Sculthorpe trousers. I also purchased the Helen’s Closet Arden pants in their recent sale as I’d love some woven joggers.
3) A light woven jacket. I’m currently working on a toile of the Sew Over It Sorrento jacket and hope to have a wearable toile and a final version in denim.
5) Dresses. I generally live in dresses and I find lightweight viscose the most comfortable material to wear. I’m working on a toile of the Muna and Broad Nullarbor, which I intend to use to create some fancy slip dresses that I can belt for smart-casual occasions. I’m also looking forward to the True Bias Shelby when the expanded sizing is released. I’m also planning to attempt a Cashmerette Roseclair to see if that bodice works any better for me than the BHL Hannah.
6) a new winter coat. I’m currently toying with the TFS Poppy, which is a lovely oversized teddy style coat; because of the design ease it shouldn’t pose too many fit issues.
Whether or not I can manage all of this by the end of winter is another matter, but it feels refreshing to have some focus and direction!
It’s been over a year since I posted and that isn’t for want of sewing and knitting.
Personal moment: I have chronic fatigue syndrome. When I started this blog I was at the mild end of the scale; working full time and able to do some crafting and socialising around work. In June 2020, I had a relapse back to moderate/severe, and I’m still in moderate territory. That has meant that a lot of things slipped by the wayside, especially when I started trying to increase the amount I could do. But lately I’ve found myself wanting to blog and feeling that I have the energy to use some downtime to think and write. I’ve found other places to be reflective, but ultimately, I still want my own space to write freely and somewhere to look back on my sewing.
So I feel a good place to start is maybe to recap on the projects I’ve already shared, and maybe then summarise where I’ve got to with everything in between.
1. The white broderie anglaise Maya top
This got donated recently. I hadn’t worn it in about a year; initially I wore it a lot out of maker pride, but once I had more makes to choose from, it was neglected. I think this is a byproduct of developing my style as I learn to make things. I’ve found that with the freedom to make anything, I’ve experimented more with colours and patterns, and I now make things I wouldn’t have thought twice about a year ago. It was well made though (French seamed throughout) so I hoped that by donating it, it would get a new lease of life with someone else. I still love the fabric though and would consider a sundress in it…
2. The BHL Hannah in floral print
This hasn’t been worn a lot because I realised quickly that I still wasn’t happy with the fit. At the time, I didn’t have the knowledge to see what I could do with it. A few months ago I altered it again to address some of the issues I wasn’t keen on, but it really needs to go back to basics with a whole new bodice and using my evolved fitting knowledge. I still love the fabric and style – it’s one of my proudest makes still because the pairing is *chef’s kiss* – so I plan to work a new bodice and attach it to the skirt.
3. Liberty Marilla Walker Maya top
I wore this a few times but I was squeezing into the largest size, which was a bit too tight in the back and underarm. I still love the fabric and it’s a well made garment so it’s still in my wardrobe (metaphorically – it’s in storage) in case either my body measurements fluctuate, which often happens, or I work out how to repurpose the fabric. If the pattern sizing was expanded I’d make this top again – it’s a good basic woven top.
4. Liberty Ogden camis
This is another example of poor fit sadly making a lovely garment unwearable. My toile was finished with bias binding facing, which meant it was much more flexible than the version made with a facing. Unfortunately the version with a facing was unwearable as it was so tight in the bust and upper bust. As with my Maya top, that one is in storage in case my body measurements fluctuate. I donated the bias facing version, as the bias facing was affecting the lines of the cami. This was my first time grading a pattern and I think I was working from old measurements, which didn’t help, as well as grading up a B cup block when I have a 6″ bust differential. The pattern has since been expanded and I’ve made more (with varying degrees of fitting success).
5. Peppermint peplum top
I wore this a LOT. Surprisingly so. It was my first garment and my finish wasn’t great (although I French seamed – I’ve always loved a French seam!). The fabric was super cute (Atelier Brunette Bye Bye Birdie) and it was a great light top to chuck on for round the house. I’ve since donated it as I hadn’t worn it in 6 months and again, I hope it gets a new lease of life. I’ve got another peplum top cut out in my WIP pile.
6. Sew House Seven Underwood tank dress
This was, objectively, a disaster. Poorly made, poorly finished, and it didn’t fit great. It was an early knit garment and I hadn’t learned how to work with stretch fabrics. It never got worn and I scrapped it. It put me off knits for several months…!
So that sums up what happened to the garments I’d shared on here, and the lessons I’ve learned with each garment.
Next up: sharing the projects I’ve made in the past year – the good, the bad, and the ugly. As always, I want to show the real side of being a self-taught beginner sewist. I know that it can often seem very daunting when everyone posts perfect makes and your early makes either don’t fit or have construction issues. Everyone has to learn somehow and it’s OK (and entirely normal) to make mistakes!
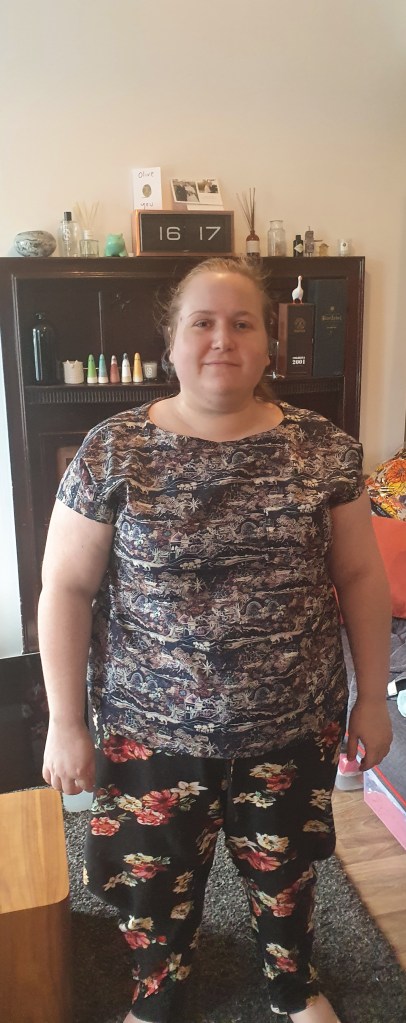
So in my last post I said I was happy with the fit of the size 24 out of the packet. Well, this quickly changed. The 24 was very gapey on the neckline – about 6″ could have been pinched out – and due to the style, I couldn’t see a way to fix it without redoing it. The more I looked at photos of Hannah dresses, the more I realised it wasn’t meant to be baggy and gapey in the bodice. So I did some research and concluded that I needed a size 20 bodice to fit my high bust, with adjustments.
I knew if I did a size 20 I’d have to do an FBA. The difference between my full bust and high bust was 4″, so the guides I read suggested a 2″ adjustment. On top of this, I knew I had a broad back and would need to adjust for that, as the fit of the 24 bodice at the back was about right – no pulling. That meant I did a 4cm BBA (yes, I mix imperial and metric as needed!). I have a very broad back…! That led me to this toile of a size 20 bodice with 2″ FBA and 4cm BBA.
This fixed the neckline gape but left a sizeable pocket of excess fabric at the side of my bust. I asked around for help, as I had no idea what adjustment was necessary as I was a beginner, and got mixed responses (including a bigger FBA). Fortunately, I’m in an online sewing club run by the fantastic The Thrifty Stitcher and she identified that my FBA was actually too big and that I also needed a narrow shoulder adjustment, as the shoulders were too wide. So I reduced the FBA to 1″ and did a 1.5cm NSA.
This reduces the pocket of fabric, but it was still there. At this point I could see the darts needed moving, as my apex was way different to the drafted apex, but I had a feeling I needed to remove a little more from the FBA. So on a hunch, I went down to a .75″ FBA and moved the darts by marking my actual apex on the pattern and then adjusting the darts to align with that. I also worked out that my side seams weren’t lining up as I had graded the front bodice pieces 2 sizes, but hadn’t graded the back bodice piece 2 sizes.
This was my fourth bodice (dress + 3 toiles) and I was pretty happy with this. The pocket of excess was gone, the moving of the darts had helped the shape considerably, and I was happy that this was the right fit for the Hannah – not extremely fitted (though I’m pulling it taut in the photos, which is creating the pulling) but not loose or baggy. I also added 1″ to the bodice length, to account for the fullness of my bust, as the small FBA hadn’t added much to it.
And here is my finished Hannah:
The fit is MUCH better than the straight 24. I actually took side by side comparison photos before I cut into my size 24 to salvage the skirt and reattach it to the size 20 bodice. You can see the difference – below is the size 24.
You can see the bodice was too oversized, as were the sleeves. I’d also got the rouleau ties the wrong way round, so my front underlap was actually overlapping instead – when I replaced the bodice I took the time to fix this and I’m much happier with it. I also kept an eye on print placement, choosing to put the large flower in the center back and ensuring the print didn’t dominate the front bodice pieces or sleeves.
Final thoughts: I’m sure an experienced sewist could find more adjustments to make, but as a beginner to fitting I’m really happy with this. I’ll definitely make up the pattern again as I love the shape of the dress, and I even have my next fabric in mind…! I’d give this a solid 8/10 – as before, some of the instructions weren’t as full as I would have liked as a total beginner, but I love the dress and once I figured the tricky aspects out it was a relatively easy sew.